
Ruleset Focus

In this week of Battle Mage Secrets, we will dive into an examination of the AIMLESS ruleset. This ruleset grants all units with the SCATTERSHOT ability, which would then supersede the Snipe ability of all Ranged and Magic Monsters. With this ruleset in play, Monsters with the Camouflaged ability or those strategically positioned in the backline can never find complete safety, as attacks become randomized, leaving them susceptible to hits! 😜

Summoner Focus

Summoner, Conqueror Jacek
When observing the AIMLESS ruleset in action, our thoughts naturally gravitate toward this Summoner. Players can deliberately incorporate this ruleset into their team by employing the Conqueror Jacek, the Fire Summoner from the Chaos Legion Edition. Priced at 6 mana, Conqueror Jacek grants the team a +2 Speed buff, the SCATTERSHOT ability reminiscent of the AIMLESS ruleset, and the Piercing ability. This widely-used Summoner is particularly effective in battles featuring the Explosive Weaponry ruleset! 😁

The Battle
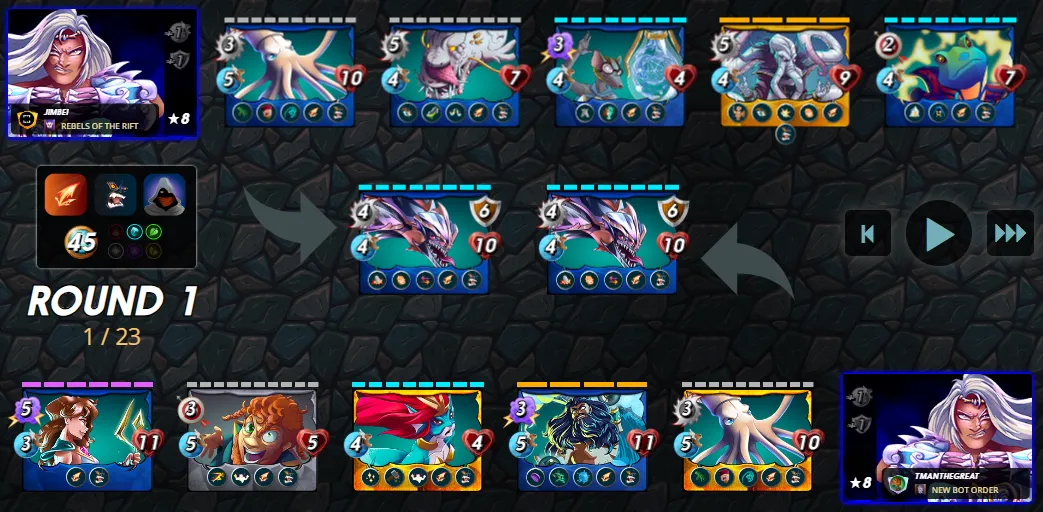
In my alt account, jimbei, I was able to engage in a battle that involves the AIMLESS ruleset. To get right into the action, the battle link can be found here. Otherwise, do read on as I go into more detail regarding the lineup and fight.

To begin our analysis, let's take a closer look at the rulesets governing this battle. Firstly, we have the main highlight of this week's challenge: the AIMLESS ruleset, which we have thoroughly explored in the preceding sections. Following that, the Ferocity ruleset, bestowing all units with the Fury ability. Lastly, there is the Silenced Summoners ruleset, which restricts Summoners from applying any stat buffs, debuffs, or utilizing any abilities. The battle imposes a mana constraint of 45 and exclusively allows the use of Water and Earth Splinters.

Summoner, Kelya Frendul
Given the Silenced Summoners ruleset, your selection of the Summoner hinges on the Splinters you intend to employ in the battle. Typically, I prefer choosing the Dragon Summoner (when available) and aligning it with the desired Splinter, as it expands my options for Monsters. In this particular battle, I decided on Kelya Frendul because I want to utilize Monsters from the Water Splinter! ✌️
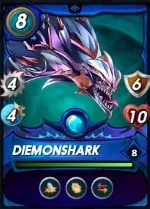
First Position, Diemonshark
I chose Diemonshark to serve as both my primary tank and damage dealer. Although it typically wouldn't be my first pick for a tank due to what I perceive as vulnerability to Magic attacks, the presence of the AIMLESS ruleset in this battle eliminates concerns about opponents targeting the tanker with Magic attacks. Additionally, Diemonshark's Retaliate ability offers the chance to counter-attack when faced with Melee assaults, enabling it to strike back against its assailant! 💪

Second Position, Flying Squid
I strategically placed the Flying Squid in the second slot to optimize its Reach ability, granting it powerful attacking capabilities from that position. Should the Diemonshark be defeated, the Flying Squid can then shift to the first position, assuming the role of a reliable tank. Additionally, its Backfire ability deals 2 damage to enemies who miss the Flying Squid during their attacks, and the Blind ability enhances the chances of all enemies failing to hit their intended targets! 😝
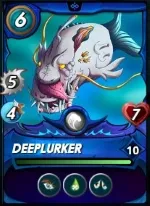
Third Position, Deeplurker
Incorporating the Deeplurker into my lineup, particularly when employing the Water Splinter, stands out as a clear choice. The Deeplurker not only has the capability to inflict Poison on its target, thereby augmenting its already remarkable offensive skills, but it also introduces the Demoralize ability. This tactical inclusion imposes a -1 Melee attack debuff on the opposing team, thereby amplifying its effectiveness in battles and contributing to a more well-rounded approach to strategic gameplay! 😉
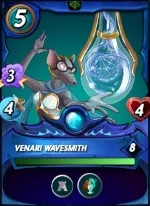
Fourth Position, Venari Wavesmith
Due to the imposition of the Silenced Summoners ruleset, Kelya Frendul cannot bestow the usual Armor buff to the lineup. Consequently, I chose to include Venari Wavesmith in my lineup for its Protect ability, providing friendly units with a +2 Armor buff. Moreover, with a mana cost of 5, Venari Wavesmith can deal 3 Magic damage! If luck is on my side, I might benefit from a fortunate random hit in this battle featuring the AIMLESS ruleset! 😜
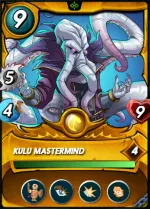
Fifth Position, Kulu Mastermind
Kulu Mastermind is among my preferred Soulbound Reward Cards, elevating the prowess of the Water Splinter. This Water Monster possesses a well-rounded set of stats that aligns with the typical attributes of a Water Splinter's Monster. By positioning Kulu Mastermind in the backline, I can take advantage of its Shield ability as needed, mitigating the impact of Sneaking Melee Monsters. At the same time, its Opportunity ability offers a strategic option to circumvent enemy tanks and target the more exposed rear positions! 😏
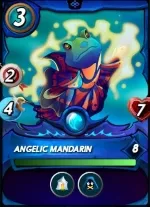
Last Position, Angelic Mandarin
The Angelic Mandarin plays a vital role as the Healer in the rear, using its Triage ability to adeptly replenish the Health of backline units. With the AIMLESS ruleset permitting random hits on the backline by Range and Magic attackers, its Healing capabilities become even more crucial. The Silence ability it possesses also aids in reducing the impact of Magic attacks from opposing Magic monsters! 😇
The Analysis
To be frank, I strongly dislike battles featuring the AIMLESS ruleset, primarily because success is heavily reliant on a favorable RNG. In such encounters, the battlefield tends to descend into chaos due to the SCATTERSHOT ability, causing Ranged and Magic attacks to randomly hit targets. This lack of control over the battle's direction can be quite frustrating! 😖
In response, I've crafted a lineup for this battle that provides me with greater command over the outcome by incorporating Melee Monsters unaffected by the AIMLESS ruleset. These Melee Monsters in my lineup possess the Reach or Opportunity abilities, allowing them to participate in attacks from the backline. Only Venari Wavesmith and Angelic Mandarin were selected not for their attacking prowess but for their supportive roles in the backline.
By sidestepping the AIMLESS ruleset, I could concentrate my attacks on specific targets rather than dealing random damage across the enemy lineup. This strategic approach enabled me to systematically eliminate targets one by one, resulting in a comfortable victory! 😎
Do you guys have any better recommendations for setting up the team in this particular ruleset? Do share them with me in the below comments 😜

If you made it this far, I sincerely appreciate your time and value your encouragement. Please feel free to leave any comments or suggestions so that we can discuss about other strategies. Thinking about giving Splinterlands a try but haven't signed up yet? Feel free to use my referral link: https://splinterlands.com?ref=ak08, and be sure to reach out to me if you have any questions!
Are you interested in reading some of my future writings? Don't forget to follow me! In the meantime, here are some of my most recent blogs if you'd like to view them:
 |  |
 |  |
All banners, dividers card and battle images used in this article are open source and obtained from the Splinterlands team or made by flauwy. Do check out his link for other amazing designs.