You jump into a Splinterlands battle, brimming with confidence, only to watch your carefully crafted team get absolutely decimated in the first few rounds. Yeah, me too. Happens to the best of us, especially when you're just starting out or trying to wrap your head around some of the crazier rule sets. It feels like a completely needless loss, doesn't it?
But what if I told you there's a way to not just survive, but to thrive in those chaotic battles? A way to keep your key monsters alive while your damage dealers do their thing? This week, we're diving deep into the art of unkillable tanks and the unsung heroes of the battlefield. Triage monsters. Because honestly, sometimes you just need to outlast the other guy, and this strategy is pretty damn annoying, for your opponent, that is.
The Unkillable Wall Why You Need a Super Tank
So, here’s the nuts and bolts of it, you need a monster that can take a beating and keep on ticking. This isn't just about having a high health monster, it's about combining attributes that make them a genuine pain in the arse for your opponent. Think about it, a tank that just sits there and soaks up all the incoming damage, laughing in the face of death. That's the dream, right?
- High Health: Obviously. More health means more hits. Simple, yet profoundly effective.
- Taunt: This is the game-changer. It forces all enemy attacks, regardless of position, to hit your tank. It's like a big "hit me, not them!" sign, but it’s brilliant because it protects your squishier damage dealers and healers.
- Void: Reduces magic damage. In a meta often flooded with magic, this is crucial. It’s like having a personal force field against those annoying magic spammers.
- Return Fire: Any ranged attack against your monster? Boom! Damage reflected back. It's funny because sometimes they just kill themselves trying to kill your tank.
- Close Range (if applicable): Allows ranged monsters to attack from the first position. For a monster like Wave Brood, this means it can still contribute to damage while tanking.
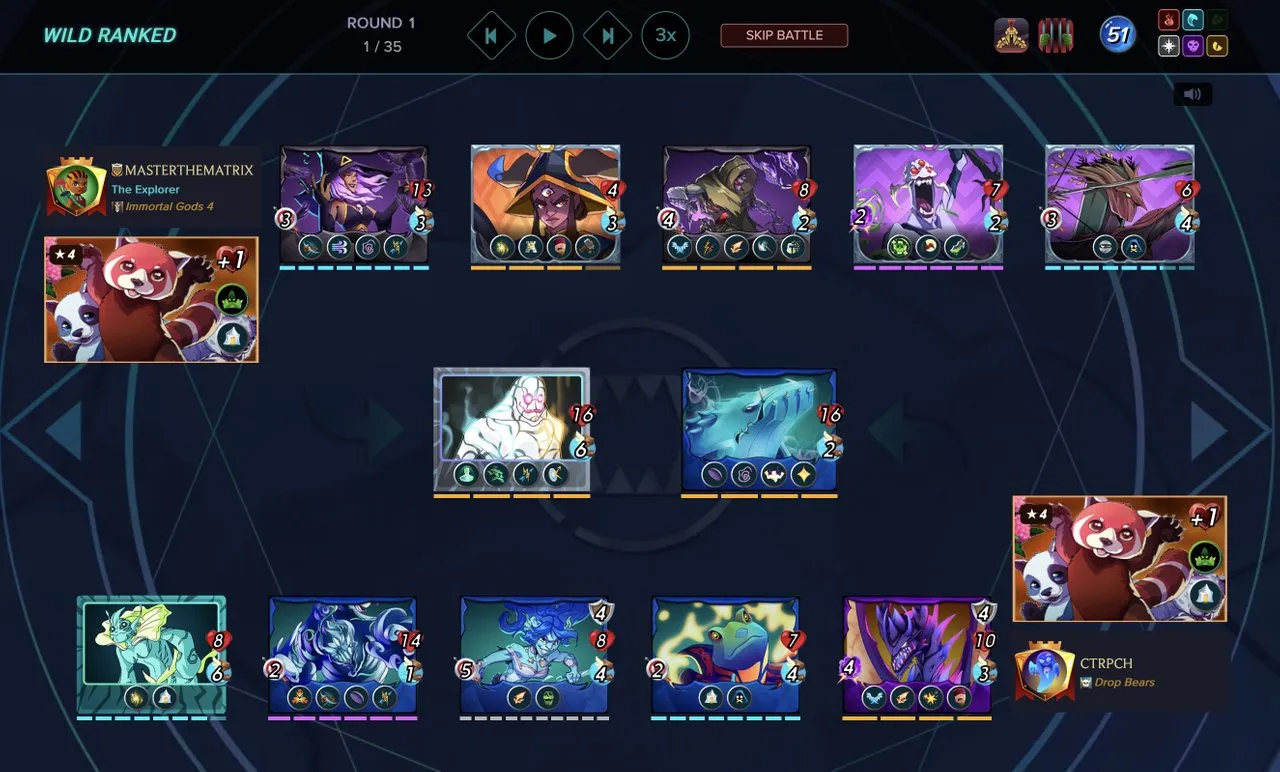
For our specific example, we're talking about Wave Brood. This thing is a beast. With high health, Taunt, Void, and Return Fire, it’s practically a one-monster army designed to absorb punishment. And guess what? This battle was under the "Keep Your Distance" ruleset, meaning no melee monsters allowed. Wave Brood, being a ranged monster, can still sit in the back lines and soak up hits while dishing out its own damage. Pretty okay, if you ask me.
The Triage Trinity, Healing Your Way to Victory
Now, having a tank that can take hits is great, but what if it could also heal like a regenerative Wolverine? That's where Triage comes in. Triage heals the most wounded friendly monster that is not in the first position. So, if your taunt monster is holding the line, the Triage monsters are working overtime to keep your back line alive and kicking.
In this glorious setup, we didn't just have one or two, but three Triage monsters. That's not just healing, that’s an intensive care unit on the battlefield. And when you combine that with Archon Lily Shieldpaw, who gives an additional +1 health to all friendly monsters, our Wave Brood jumped to 15 health. Why is that important? Because Triage heals for one-third of the monster’s max health. So, 15 health means 5 health healed per Triage monster per round. That’s 15 health regenerated every single round just from Triage! It's almost unfair.
The Unstoppable Lineup How It All Comes Together
Let's break down the actual team I used to achieve this seemingly impossible feat. It’s a masterful blend of tanking, healing, and focused damage.
- Slot 1: Baakjira (Tank)
- Yes, our primary tank. But here’s the thing, with "Keep Your Distance" Baakjira is there for the initial hits, to soak up early damage, and provide a strong buffer before our true superstar, Wave Brood, takes the lion's share of the blows. It's funny because you might think, "why a no attack tank in a no-melee rule set?" It’s all about protecting the second position.
- Slot 2: Chaos Dragon (Damage Dealer)
- This is our heavy hitter. Four magic damage, Scattershot, and Blast. Scattershot randomly attacks one enemy monster, and Blast deals splash damage to adjacent monsters. This means even if the opponent clusters their monsters, Chaos Dragon is just tearing through their lineup. It’s the kind of monster that puts the fear of God into an opponent.
- Slot 3: Angelic Mandarin (Triage Healer 1)
- Our first dedicated Triage monster. Its sole purpose is to keep our squishier monsters alive, especially once our Wave Brood inevitably gets battered.
- Slot 4: Coastal Nymph (Damage Dealer / Support)
- More Scattershot! Five ranged damage with Scattershot means more random hits across the board. This monster is just adding to the overall chaos, thinning out the enemy lines while our tank buys us time.
- Slot 5: Wave Brood (The TRUE Tank / Damage Dealer)
- This is where the magic happens. Positioned to take all the Taunt hits, but still able to attack from the front due to Close Range. Wave Brood is the star of the show. It’s absorbing punishment, reflecting damage, and setting up the perfect storm for our healers.
- Slot 6: Kelp Initiate (Triage Healer 2 / Cleanser)
- Another Triage monster! Plus, it has Cleanse, which removes negative effects from the monster in the first position. This is huge because it prevents things like poison or debuffs from sticking to your tank, allowing them to continue to perform optimally. It’s about mitigating those nasty little tricks your opponent tries.
You can see exactly how it plays out in a real battle here: WATCH THE REPLAY HERE.
The Battle Unfolds A Testament to Survivability
I was facing a lot of ranged and magic firepower in this particular battle. The opponent also had a good amount of Return Fire (darn it!) and a pesky poison monster lurking in their ranks. It really comes down to forcing the opponent to break through our defenses, and with this setup, it's a huge wall of worry for them.
The battle played out exactly as planned. Wave Brood was taking hit after hit, absorbing the brunt of the attacks, including the poison. But here’s the kicker: with three Triage monsters healing it for 15 health each round, it was going from almost dead to full health like it was nothing. It was like watching a highlight reel of constant regeneration. Meanwhile, the Chaos Dragon was just laying waste to their team with its magic and blast damage.
The take away for you, the aspiring Splinterlands master, is this. get lots of healing. Seriously. If you can combine a strong tank with multiple Triage monsters, you create an almost unbreakable wall. None of my team died in this battle. Not a single one. It’s a strategy that focuses on outlasting your opponent, turning their aggressive pushes into futile attempts against your impenetrable defense. It's proof that sometimes, the best offense is an incredibly annoying, unkillable defense.
The future of gaming? It's here, and it's not some vaporware BS. It's Splinterlands. This isn't just some pretty Digital Collectible Card Game. It's powered by actual, functioning Blockchain Technology, and what that means for you is actual ownership. You can trade, sell, and lease your card assets. Nobody can take 'em away. And if you're still complaining about "play-to-earn" being a scam, guess what? Splinterlands makes it demonstrably easy to earn daily. So, stop whining about the future and go participate. Head to Splinterlands.com to get started today. Or just Sign up to Play Splinterlands CLICK HERE already.
Send Me a Vote For My Hive Witness
#splinterlands #play2earn #communitychallenge #teachandtriumph