Español
El otro día, mientras dejaba comentarios de ayuda a algunos usuarios, me di cuenta que hay varios compañeros, aquí en Hive, que no estan al tanto de las útiles herramientras que podemos usar para mejorar nuestras publicaciones. Herramientas tan sencillas, pero prácticas, como lo son las tablas (markdown) y las capas (html).
Por eso hoy me gustaría compartir con ustedes una guía fácil y sencilla sobre cómo mejorar sus publicaciones usando una de estas herramientas, las tablas. Espero les resulte útil la publicación. ¡Comencémos!
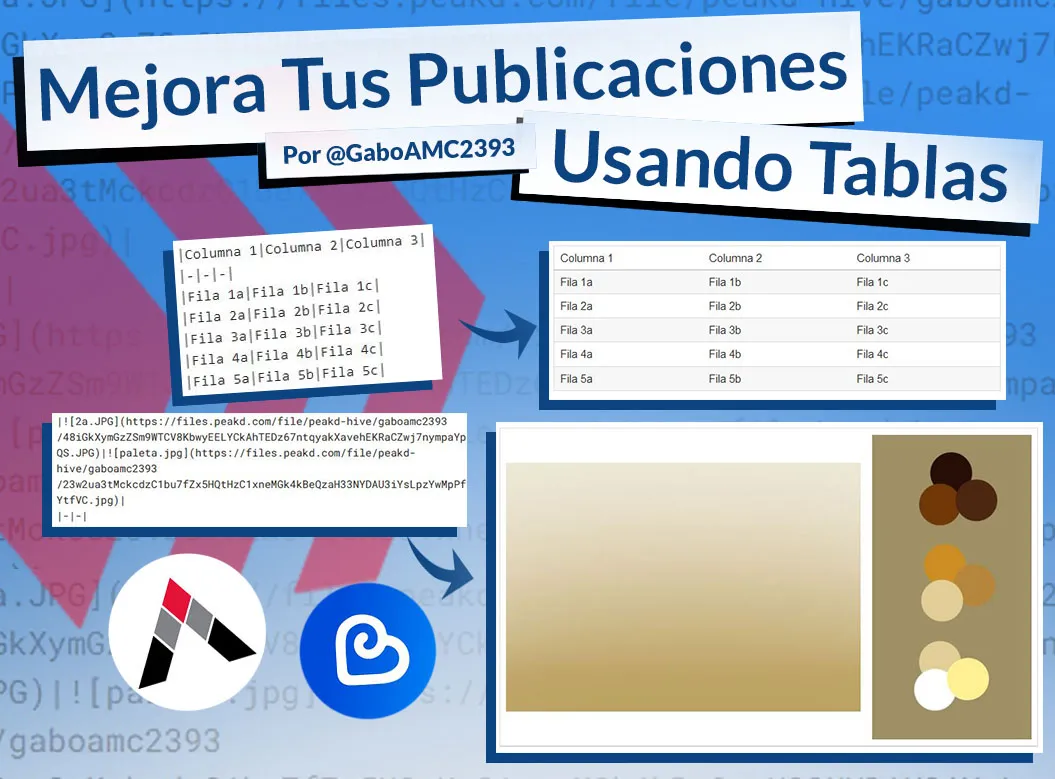
Como podrán imaginar, para crear tablas en nuestras publicaciones debemos usar una serie de códigos.
Las tablas las podemos encontrar en los distintos editores de texto que tenemos, tanto en peakd como ecency. Para generar estos códigos hay que hacer clic en los botones existentes en los editores de texto, tal como se aprecia en la imagen junto a este párrafo.
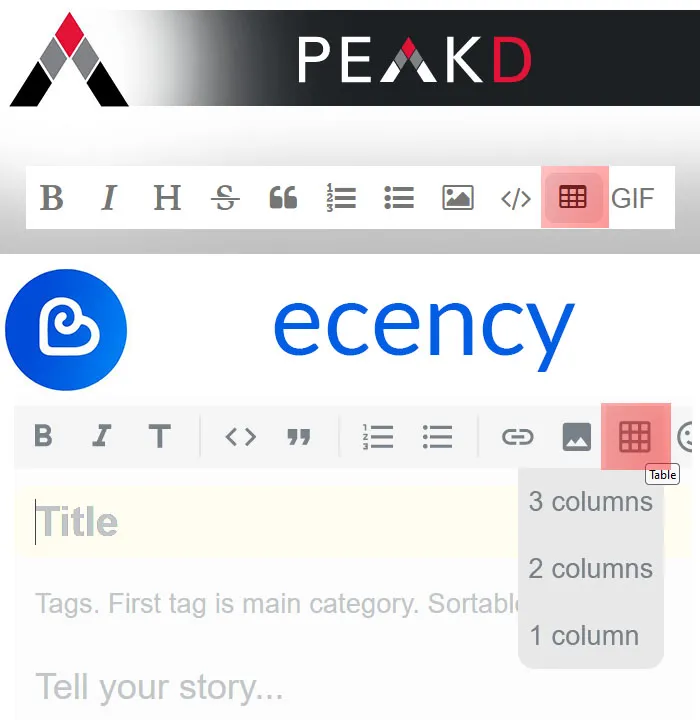
Con el código generado se creará una tabla genérica de 2 filas y 3 columnas. Esta tabla la podemos configurar y darle un formato distinto, conforme a lo que necesitemos en cada caso.
Nota. Para este tutorial, usaré el código que genera el editor de texto de PeakD.
El código que se genera, al usar el botón del editor, es el siguiente:
|column1|column2|column3|
|-|-|-|
|content1|content2|content3|
Vista previa de la tabla:
| column1 | column2 | column3 |
|---|---|---|
| content1 | content2 | content3 |
Como les dije, las tablas se pueden usar para distintos casos. Yo habitualmente las uso para agrupar mejor mis fotografías.
Si una publicación está cargada de muchas fotos, pero no sabes usar algún editor de imágenes para hacer un collage, puedes usar tablas como alternativa.
 |
|---|
 |
Por otra parte, cuando haces un collage en un editor de fotos, cada foto que lo compone pierde calidad; por lo tanto, si deseas mantener la calidad de las fotos y usar muchas imágenes en tu post, yo recomiendo el uso de estas tablas para agruparlas.
¿Por qué? Porque la tabla simplemente hace más pequeña la imagen, pero al hacer clic sobre esta, se hace grande y se puede visualizar manteniendo la calidad original
¿Cómo las puedo usar?
Te explico el formato de la tabla. Una tabla es un conjunto de celdas o elementos agrupados en filas y columnas. Las columnas son las que estan en vertical y las filas en horizontal.
Aquí un ejemplo para que puedan visualizarlo mejor.
| Columna 1 (Fila 1) | Columna 2 (Fila 1) | Columna 3 (Fila 1) |
|---|---|---|
| Fila 2 | Contenido 1 fila 2 | Contenido 2 fila 2 |
| Fila 3 | Contenido 1 fila 3 | Contenido 2 fila 3 |
Si lo reemplazamos por datos reales, la utilidad de una tabla sería la siguiente:
| Animal | Color | Tamaño |
|---|---|---|
| Gato | Negro | Pequeño |
| Perro | Marrón | Grande |
En la fila 1 del formato de arriba, estan los encabezados de la tabla o, para que se entienda, el título de cada columna. En las filas siguientes (fila 2 y fila 3), estan los otros elementos o el contenido de la tabla, el cual varía según la columna en la que se encuentra.
Vean el mismo ejemplo otra vez:
| Animal | Color | Tamaño |
|---|---|---|
| Gato (1) | Negro | Pequeño (2) |
| Perro | Marrón (3) | Grande |
- Gato (1), en la fila 2 de la columna 1
- Pequeño (2), en la fila 2 de la columna 3
- Marrón (3), en la fila 3 de la columna 2.
Ahora bien, esto es para texto. ¿Cómo se puede usar para otra cosa? Simplemente reemplazamos el texto por el código de otro objeto, como un emoji o el link de una foto. Voy a explicarlo con los emojis que ofrece este mismo editor.
Aquí el código:
|��|��|��|
|-|-|-|
|��|✌️|��|
Aquí la vista previa:
| 😀 | 😄 | 😁 |
|---|---|---|
| 🤞 | ✌️ | 🤘 |
Sin importar lo que se coloque entre el código " | Contenido de la celda | ", esto va a aparecer en la tabla. Siempre y cuando esté con el formato correcto.
Formato de la tablas.
Como ya les mencioné, el formato original es el de tres columnas y dos filas (la fila de los títulos y la fila del contenido).
| Título 1 (Columna 1) | Título 2 (Columna 2) | Título 3 (Columna 3) |
|---|---|---|
| Contenido 1 | Contenido 2 | Contenido 3 |
Aunque este es el formato que genera el botón mencionado arriba, lo cierto es que podemos modificar estas tablas para ajustarlo a lo que queremos.
Aquí dos ejemplos:
- Tabla de 3 columnas y 1 fila
| Columna 1 - Fila 1 | Columna 2 - Fila 1 | Columna 3 - Fila 1 |
|---|
Código:
|Columna 1 - Fila 1|Columna 2 - Fila 1|Columna 3 - Fila 1|
|-|-|-|
- Tabla de 3 columnas y 5 filas
| Columna 1 | Columna 2 | Columna 3 |
|---|---|---|
| Fila 2 | Fila 2 | Fila 2 |
| Fila 3 | Fila 3 | Fila 3 |
| Fila 4 | Fila 4 | Fila 4 |
| Fila 5 | Fila 5 | Fila 5 |
Nota. La fila 1 es la fila en donde está escrito "Columna 1, Columna 2 y Columna 3"
Código:
|Columna 1|Columna 2|Columna 3|
|-|-|-|
|Fila 2|Fila 2|Fila 2|
|Fila 3|Fila 3|Fila 3|
|Fila 4|Fila 4|Fila 4|
|Fila 5|Fila 5|Fila 5|
Cabe destacar, que así como podemos colocar tantas filas como queramos, también podemos cambiar la cantidad de columnas que queremos para nuestra tabla; sin embargo, hay algo que se debe respetar.
Verán, si se han dado cuenta, la tabla está compuesta por tres elementos:
Fila principal (1), el código que da formato a la tabla (2) y las filas(3).
1   -->   |Columna 1|Columna 2|Columna 3|
2   -->   |-|-|-|
3   -->   |Fila 2|Fila 2|Fila 2|
Si queremos, por ejemplo, que sea una tabla de 2 columnas, simplemente debemos borrar los códigos de la columna que queremos eliminar.
El código quedaría de la siguiente manera para una tabla de 2 columnas y 2 filas:
|Columna 1|Columna 2|
|-|-|
|Fila 2|Fila 2|
Vean una comparación del código entre una tabla y la otra:
Tabla de 2 columnas y 2 filas.
|Columna 1|Columna 2|
|-|-|
|Fila 2|Fila 2|
Tabla de 3 columnas y 2 filas.
|Columna 1|Columna 2|Columna 3|
|-|-|-|
|Fila 2|Fila 2|Fila 2|
Aquí otra comparación de códigos, esta vez agregando otra columna a la tabla. Porque sí, también podemos agregar más columnas:
Tabla de 2 columnas y 2 filas.
|Columna 1|Columna 2|
|-|-|
|Fila 2|Fila 2|
Tabla de 4 columnas y 2 filas.
|Columna 1|Columna 2|Columna 3|Columna 4|
|-|-|-|-|
|Fila 2|Fila 2|Fila 2|Fila 2|
Vista previa de una tabla de 4 columnas:
| Columna 1 | Columna 2 | Columna 3 | Columna 4 |
|---|---|---|---|
| Fila 2 | Fila 2 | Fila 2 | Fila 2 |
Uso práctico
Como han visto, podemos aplicar diferentes formatos a las tablas y usarlas para mejorar la estructura de nuestras publicaciones. Pero... ¿qué uso práctico tienen las tablas? Además de lo mencionado, podemos usarlos, como ya he dicho, para agrupar fotos.
Aquí un par de ejemplos de cómo se pueden agrupar fotos usando tablas.
- Ejemplo 1
 |  |  |
|---|
Código:
|Foto 1|Foto 2|Foto 3|
|-|-|-|

//Comentario: reemplace "Foto 1, 2 o 3" por el código de las fotos.
- Ejemplo 2
 |  |
|---|
|Foto 1|Foto 2|
|-|-|

//Comentario: reemplace "Foto 1 o 2" por el código de las fotos.
- Ejemplo 3
 |  |
|---|
 |  |  |
|---|
Código:
|Foto 1|Foto 2|
|-|-|
//Comentario 1: necesario dejar este espacio entre el cógido de arriba y el de abajo.
|Foto 3|Foto 4|Foto 5|
|-|-|-|

//Comentario 2: reemplace "Foto 1, 2 o 3.." por el código de las fotos.
Como ven, las tablas son muy versátiles y una vez que las dominamos, podemos usarlas para dar distintos formatos o maquetado a nuesta publicación. Lo cual nos permitirá crear contenido de mejor calidad en nuestro blog.
Bien amigos, esto ha sido todo por ahora. De corazón espero que mi publicación les haya sido de utilidad o, cuando menos, les haya gustado. ¿Y tu? ¿Ya has usado las tablas en tus publicaciones o ni siquiera sabías que existían?
Sea cual sea el caso, los invito a dejar sus opiniones o dudas sobre este tema abajo en los comentarios, como siempre estaré encantado de leerlos. Sin más que agregar, me despido entonces...
¡Hasta la próxima!
English
The other day, while leaving comments to help some users, I realized that there are several colleagues here at Hive who are not aware of the useful tools we can use to improve our publications. Tools as simple, but practical, as tables (markdown) and layers (html).
That's why today I would like to share with you an easy and simple guide on how to improve your publications using one of these tools, tables. I hope you find the publication useful, let's get started!

As you can imagine, to create tables in our publications we must use a series of codes.
The tables can be found in the different text editors we have, both in peakd and ecency. To generate these codes, click on the existing buttons in the text editors, as shown in the image next to this paragraph.
With the generated code a generic table of 2 rows and 3 columns will be created. This table can be configured and formatted differently, according to what is needed in each case.
Nota. For this tutorial, I will use the code generated by the PeakD text editor.
The code that is generated, when using the editor button, is as follows:
|column1|column2|column3|
|-|-|-|
|content1|content2|content3|
Table preview:
| column1 | column2 | column3 |
|---|---|---|
| content1 | content2 | content3 |
As I told you, tables can be used for different cases. I usually use them to better group my photographs.
If a post is loaded with many photos, but you don't know how to use an image editor to make a collage, you can use tables as an alternative.
|
|---|
|
On the other hand, when you make a collage in a photo editor, each photo that composes it loses quality; therefore, if you want to keep the quality of the photos and use many images in your post, I recommend using these tables to group them.
Why? Because the table simply makes the image smaller, but when you click on it, it becomes large and can be displayed maintaining the original quality.
How can I use them?
Let me explain the table format. A table is a set of cells or elements grouped in rows and columns. The columns are the ones that are vertically and the rows are horizontally.
Here is an example so that you can visualize it better.
| Column 1 (Row 1) | Column 2 (Row 1) | Column 3 (Row 1) |
|---|---|---|
| Row 2 | Content 1 Row 2 | Content 2 Row 2 |
| Row 3 | Content 1 Row 3 | Content 2 Row 3 |
If we replace it with real data, the usefulness of a table would be as follows:
| Animal | Color | Size |
|---|---|---|
| Cat | Black | Little |
| Dog | Brown | Big |
In row 1 of the above format, there are the headings of the table or, to be understood, the title of each column. In the following rows (row 2 and row 3), there are the other elements or the contents of the table, which vary according to the column in which it is located.
Look at the same example again:
| Animal | Color | Tamaño |
|---|---|---|
| Cat (1) | Black | Little (2) |
| Dog | Brown (3) | Big |
- Cat (1), in row 2 of column 1
- Small (2), in row 2 of column 3
- Brown (3), in row 3 of column 2.
Now, this is for text, how can it be used for something else? We simply replace the text with the code of another object, like an emoji or the link of a photo. I am going to explain it with the emojis that this same editor offers.
Here the code:
|��|��|��|
|-|-|-|
|��|✌️|��|
Here the preview:
| 😀 | 😄 | 😁 |
|---|---|---|
| 🤞 | ✌️ | 🤘 |
No matter what is placed between the code " | Cell Contents | ", it will appear in the table. As long as it is formatted correctly.
Table format
As I already mentioned, the original format is three columns and two rows (the title row and the content row).
| Title 1 (Column 1) | Title 2 (Column 2) | Title 3 (Column 3) |
|---|---|---|
| Content 1 | Content 2 | Content 3 |
Although this is the format generated by the button mentioned above, the truth is that we can modify these tables to adjust it to what we want.
Here are two examples:
- Table with 3 columns and 1 row.
| Column 1 - Row 1 | Column 2 - Row 1 | Column 3 - Row 1 |
|---|
Code:
|Column 1 - Row 1|Column 2 - Row 1|Column 3 - Row 1|
|-|-|-|
- Table with 3 columns and 5 rows
| Column 1 | Column 2 | Column 3 |
|---|---|---|
| Row 2 | Row 2 | Row 2 |
| Row 3 | Row 3 | Row 3 |
| Row 4 | Row 4 | Row 4 |
| Row 5 | Row 5 | Row 5 |
Note. Row 1 is the row where "Column 1, Column 2 and Column 3" is written.
Code:
|Column 1|Column 2|Column 3|
|-|-|-|
|Row 2|Row 2|Row 2|
|Row 3|Row 3|Row 3|
|Row 4|Row 4|Row 4|
|Row 5|Row 5|Row 5|
It is worth noting that just as we can place as many rows as we want, we can also change the number of columns we want for our table; however, there is something that must be respected.
You see, if you have noticed, the table is composed of three elements:
Main row (1), the code that formats the table (2) and the rows(3).
1   -->   |Column 1|Column 2|Column 3|
2   -->   |-|-|-|
3   -->   |Row 2|Row 2|Row 2|
If we want, for example, a table with 2 columns, we simply need to delete the codes of the column we want to delete.
The code would look like this for a table with 2 columns and 2 rows:
|Column 1|Column 2|
|-|-|
|Row 2|Row 2|
See a comparison of the code between one table and the other:
Table of 2 columns and 2 rows.
|Column 1|Column 2|
|-|-|
|Row 2|Row 2|
Table of 3 columns and 2 rows.
|Column 1|Column 2|Column 3|
|-|-|-|
|Row 2|Row 2|Row 2|
Here is another code comparison, this time adding another column to the table. Because yes, we can also add more columns:
Table of 2 columns and 2 rows.
|Column 1|Column 2|
|-|-|
|Row 2|Row 2|
Table of 4 columns and 2 rows.
|Column 1|Column 2|Column 3|Column 4|
|-|-|-|-|
|Row 2|Row 2|Row 2|Row 2|Row 2|
Preview of a 4-column table:
| Column 1 | Column 2 | Column 3 | Column 4 |
|---|---|---|---|
| Row 2 | Row 2 | Row 2 | Row 2 |
Practical use
As you have seen, we can apply different formats to tables and use them to improve the structure of our publications. But... what practical use do tables have? In addition to the above, we can use them, as I said, to group photos.
Here are a couple of examples of how photos can be grouped using tables.
- Example 1
| | |
|---|
Code:
|Photo 1|Photo 2|Photo 3|
|-|-|-|

//Comment: replace "Photo 1, 2 or 3" with the code of the photos.
- Example 2
| |
|---|
Code:
|Photo 1|Photo 2|
|-|-|

//Comment: replace "Photo 1 or 2" by the code of the photos.
- Example 3
| |
|---|
| | |
|---|
Code:
|Photo 1|Photo 2|
|-|-|
//Comment 1: it is necessary to leave this space between the top and bottom code.
|Photo 3|Photo 4|Photo 5|
|-|-|-|

//Comment 2: replace "Photo 1, 2 or 3..." by the code of the photos.
As you can see, tables are very versatile and once we master them, we can use them to give different formats or layout to our publication. This will allow us to create better quality content in our blog.
Well friends, that's all for now. I sincerely hope you found my post useful or, at least, you liked it. What about you? Have you already used tables in your publications or you didn't even know they existed?
Whatever the case, I invite you to leave your opinions or doubts about this topic below in the comments, as always I will be happy to read them. With nothing more to add, I'll say goodbye then...
See you next time!

Traducido con DeepL
Fotos usadas en el post son de mi propiedad o capturadas de post de hive de mi autoría.
Photos used in the post are my own or captured from hive post of my authorship.
Improving Instant Soup
Turtle Sculpture
First Year At Hive