English
Without meaning to sound boastful, or anything like that, one of the great things about being me is that I can make unique and personalized gifts with my own hands.
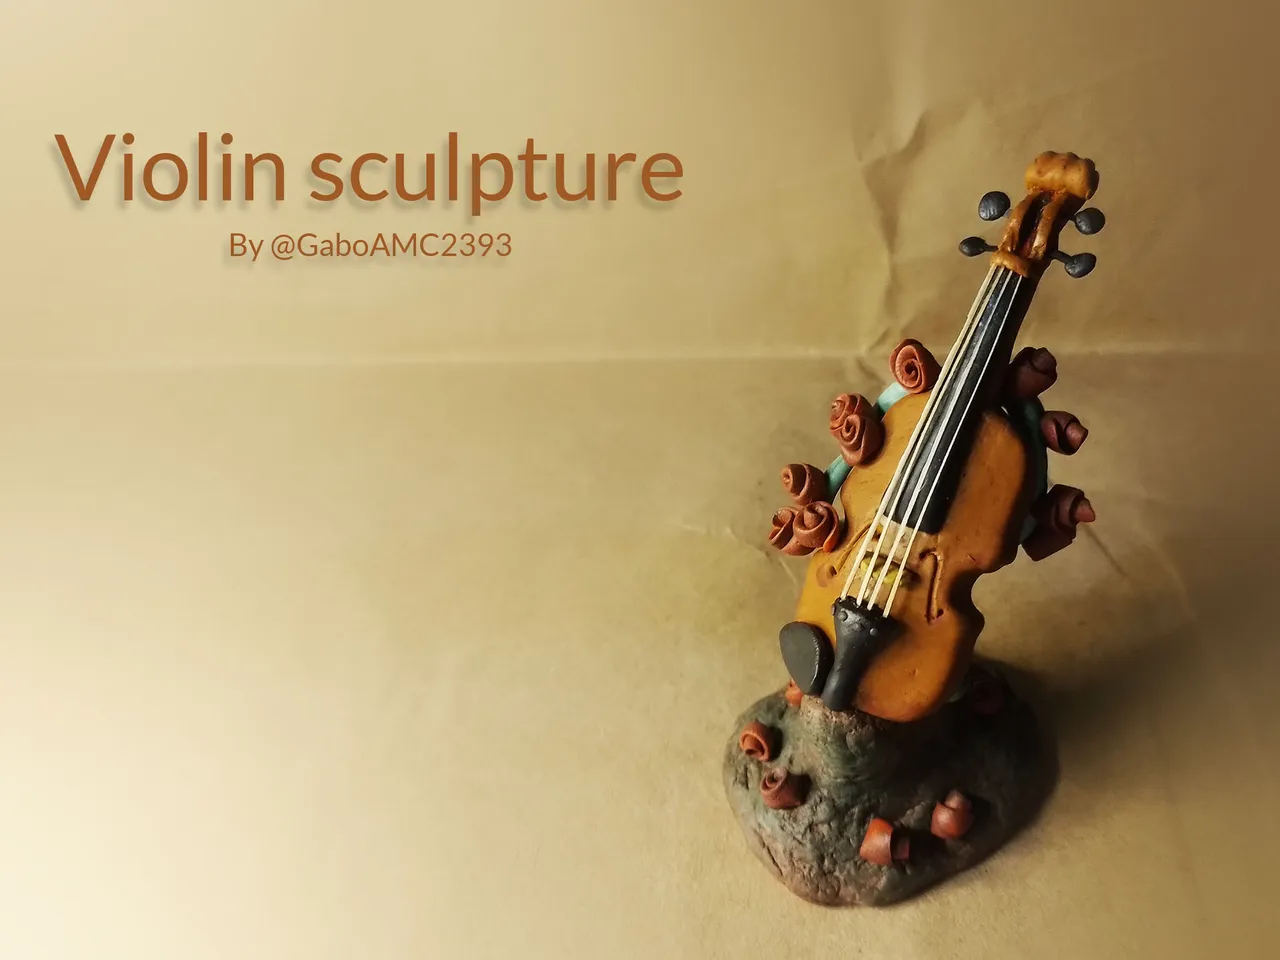
I recently wanted to give a gift to another neighbor who decided to start in the world of music. She is really talented and to encourage her to keep practicing, I decided to make her this sculpture of a violin. Join me in the step by step of this sculpture, I hope you like it.
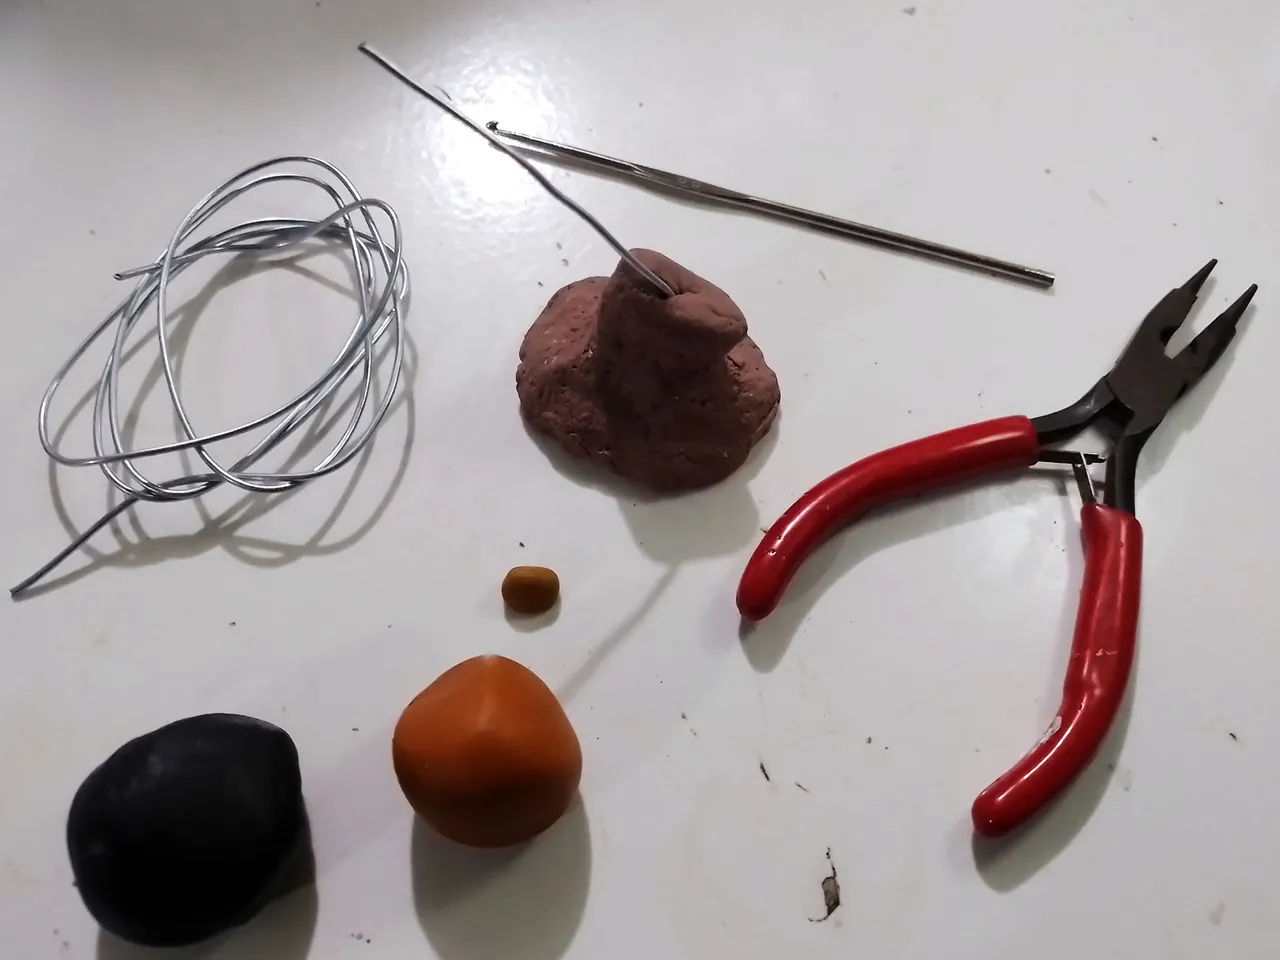
Well, for this sculpture I used the materials I usually use to make this kind of figurines. Plasticine, wire and paint. In addition, I used tools such as tweezers, knitting and sewing needles, as well as very fine brushes, markers, a blade and some wooden sticks.
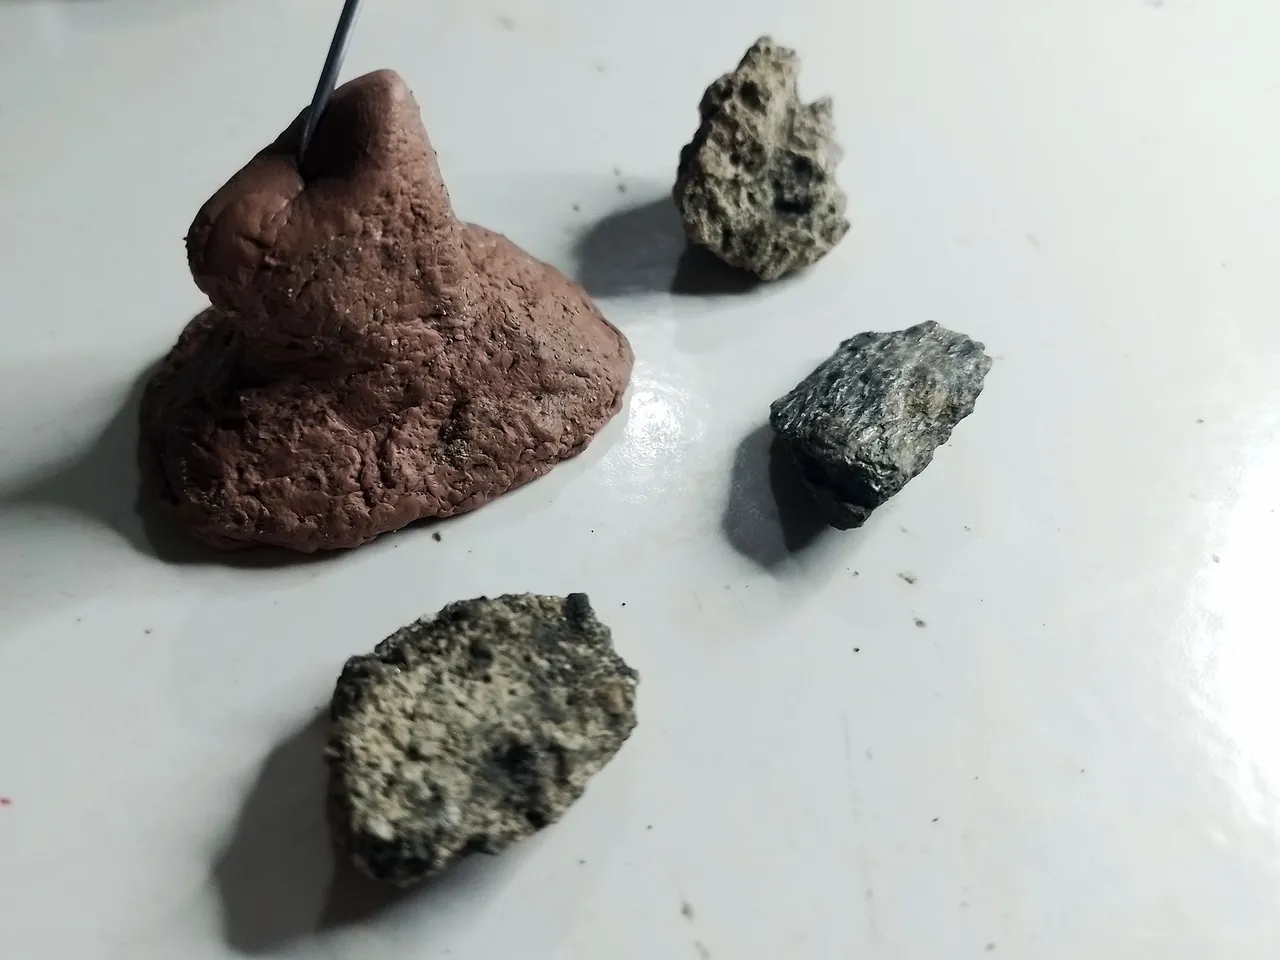
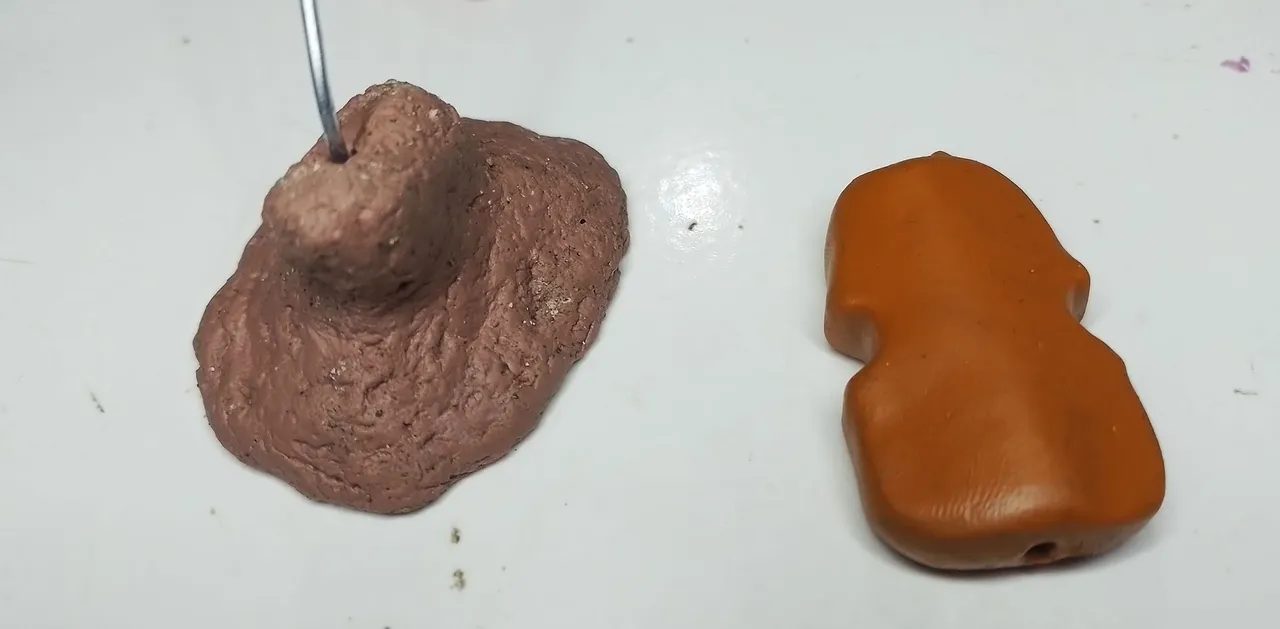
The base of the sculpture would be a rock, which would serve as a support to hold the instrument. To make this rock I used a piece of plasticine and covered the wire frame with it.
To give it the rocky texture I used real rocks. Simply take the rocks and print the rock pattern on the plasticine, pressing the rock against the moldable material. As you can see in the image below, those were the rocks I used to give it exa texture:
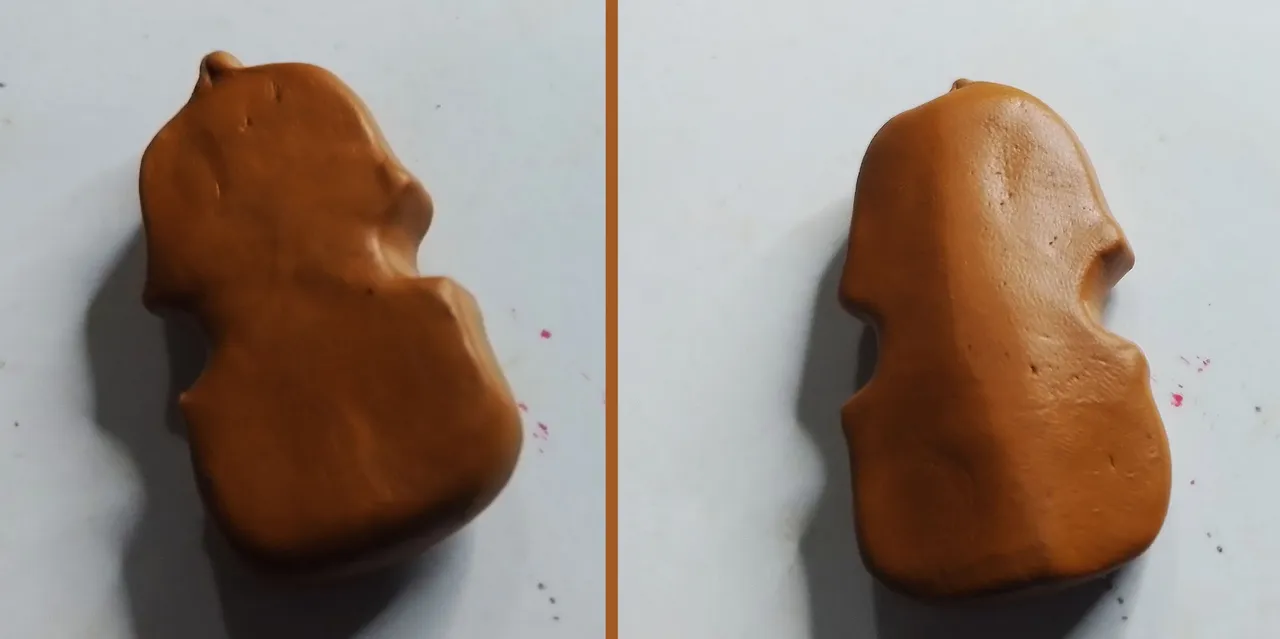
To mold the violin I used a brown plasticine, which I darkened a little with yellow and black plasticine. Once I got the desired color I began to mold.
I must clarify that the lady to whom I gave this gift has a violin, so it was the one I used as a model for the sculpture.
The molding process was not easy, I must confess, but little by little I managed to smooth the plasticine enough to achieve the desired result, or at least, one that was close enough to the shape of the violin.
Here you can see the two main parts of the sculpture, the body of the instrument and the base on which it will rest:
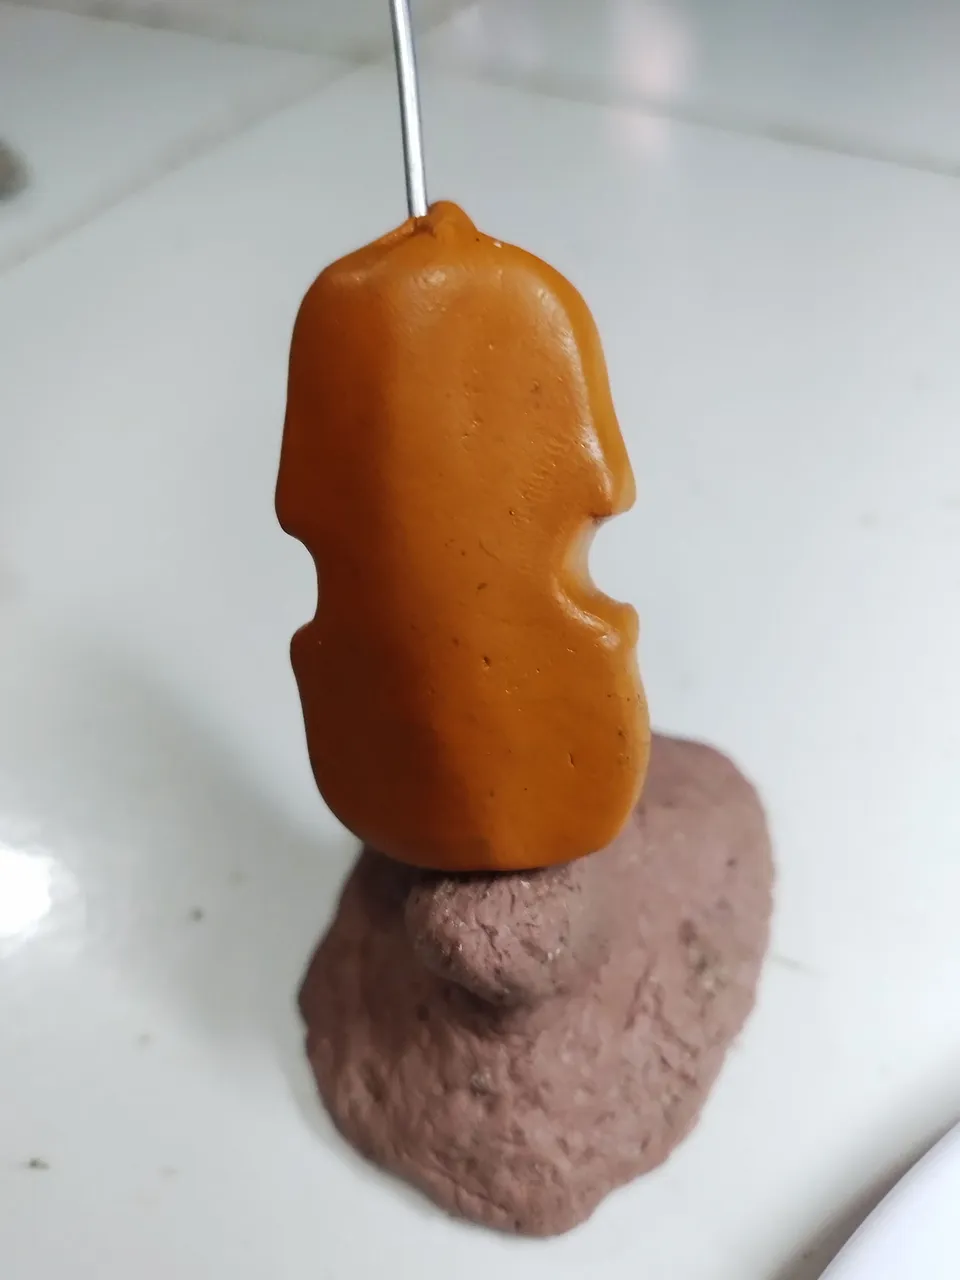
To place the instrument on the base, I left a wire sticking out of the plasticine. I made a hole that went through the whole violin and through this hole I introduced the wire that went from the base in the shape of a rock, so the whole sculpture would become a single piece.
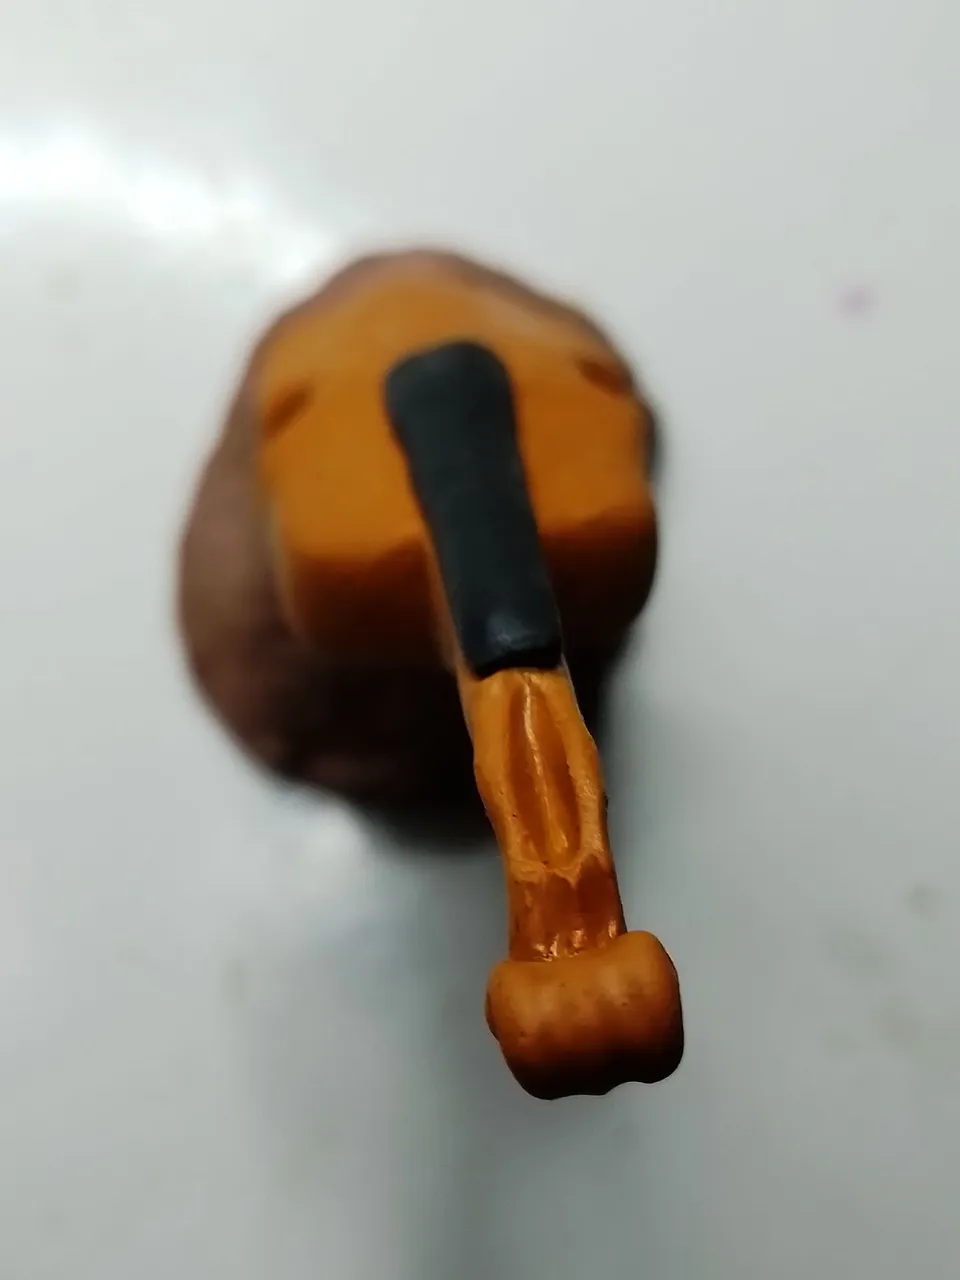
After this I made another of the most complicated pieces of the sculpture, something that we could call the neck (handle) and the head (pegbox), where the characteristic snail is located at the top.
I must confess that I had to damage it and redo it a couple of times, because it did not fit well. Sometimes it looked like a Chello or a double bass, but in the end I managed to give the instrument the right shape.
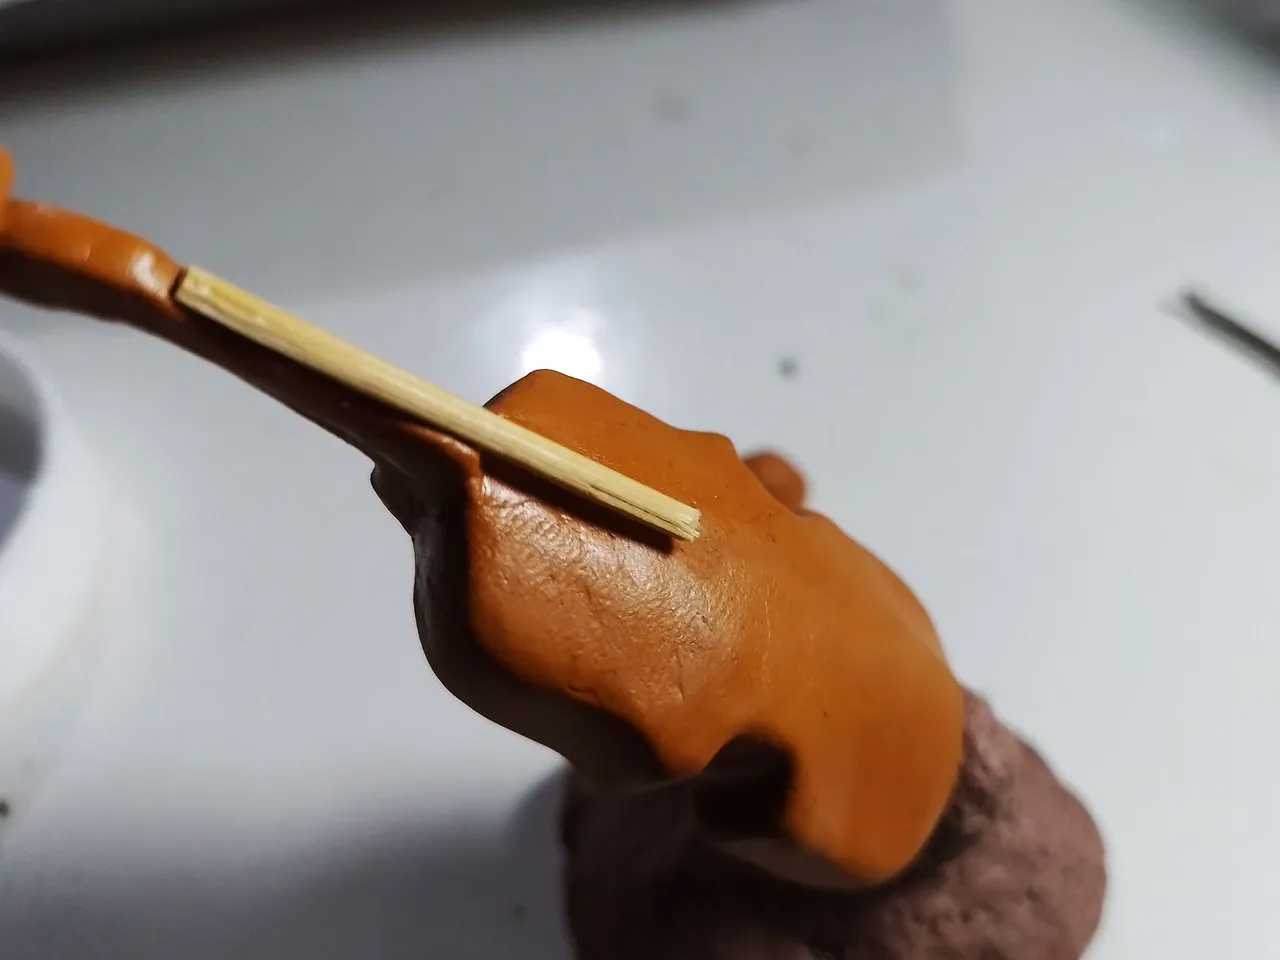
Below you can see a few pictures of this part of the creative process. You can even see the wooden support for the black part of the violin, which goes in the center.
 |  |
|---|
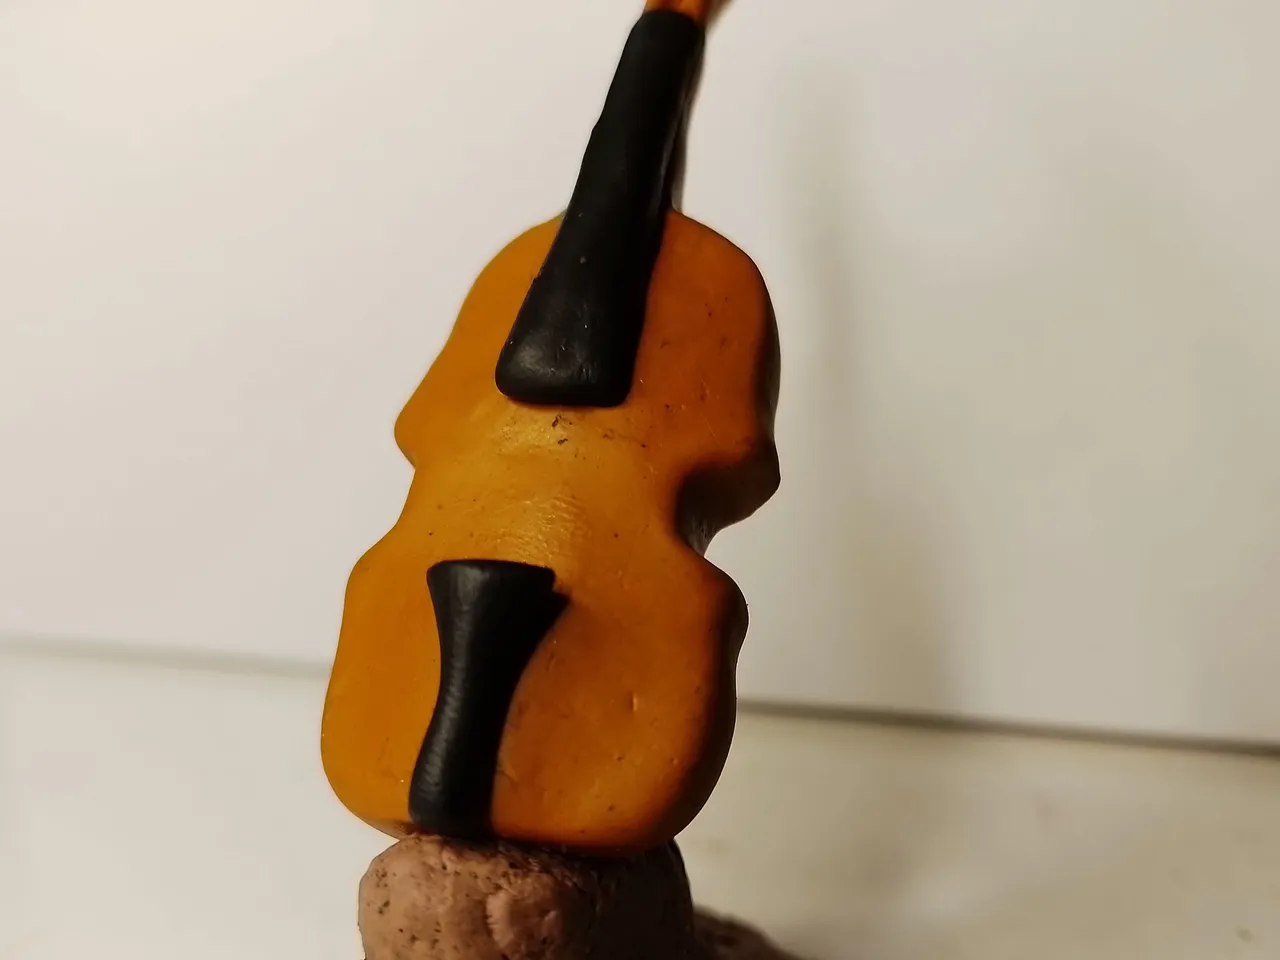
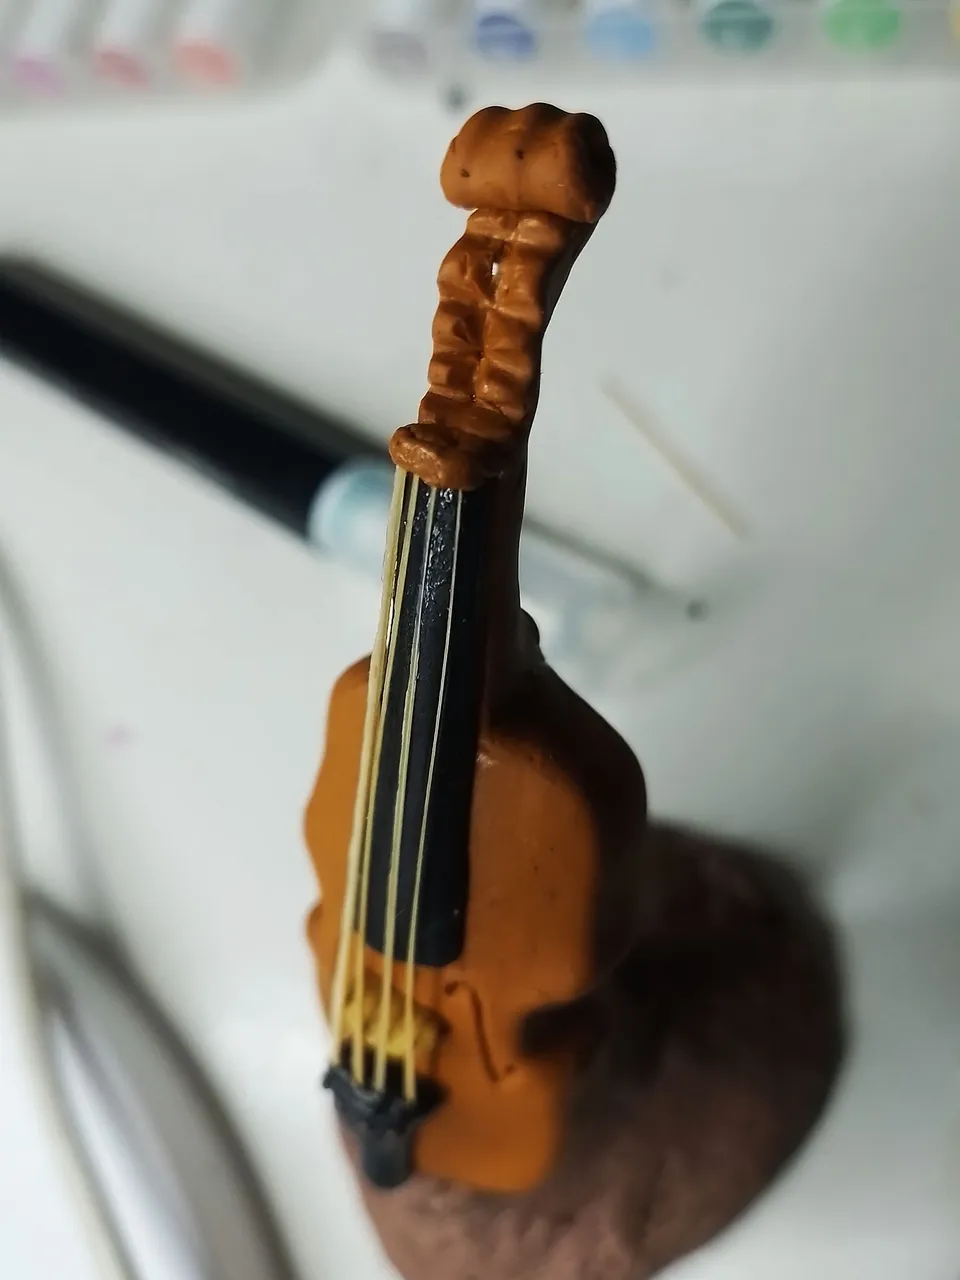
This black part, called the tuning fork, was made by covering the aforementioned wooden support with black plasticine. Once it was done I put it in place.
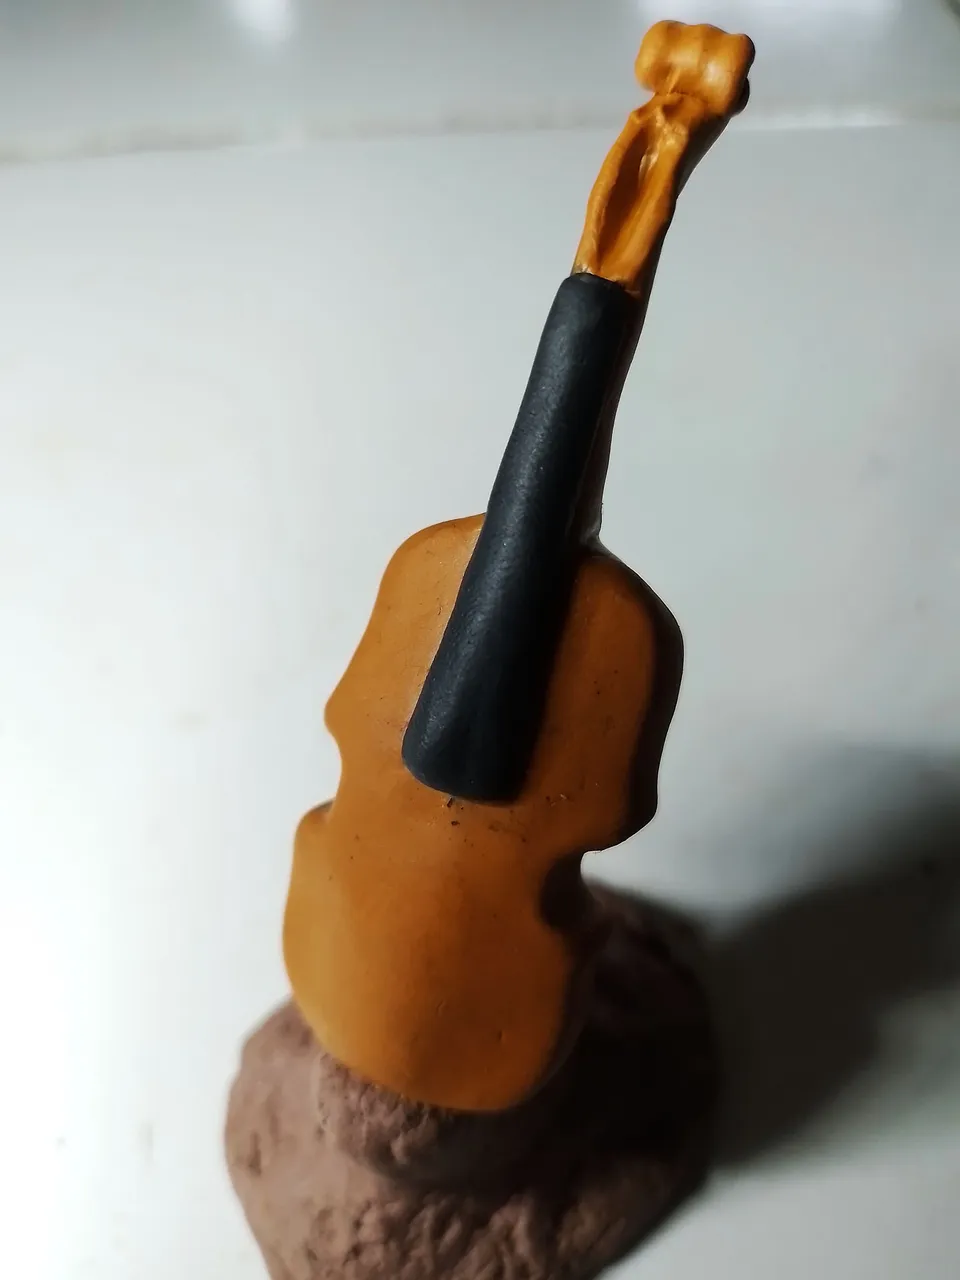
After this I finished with the head of the instrument or the pegbox. The pegs I would put in later.
At this point the instrument was already taking shape, it looked like this:
 |  |
|---|
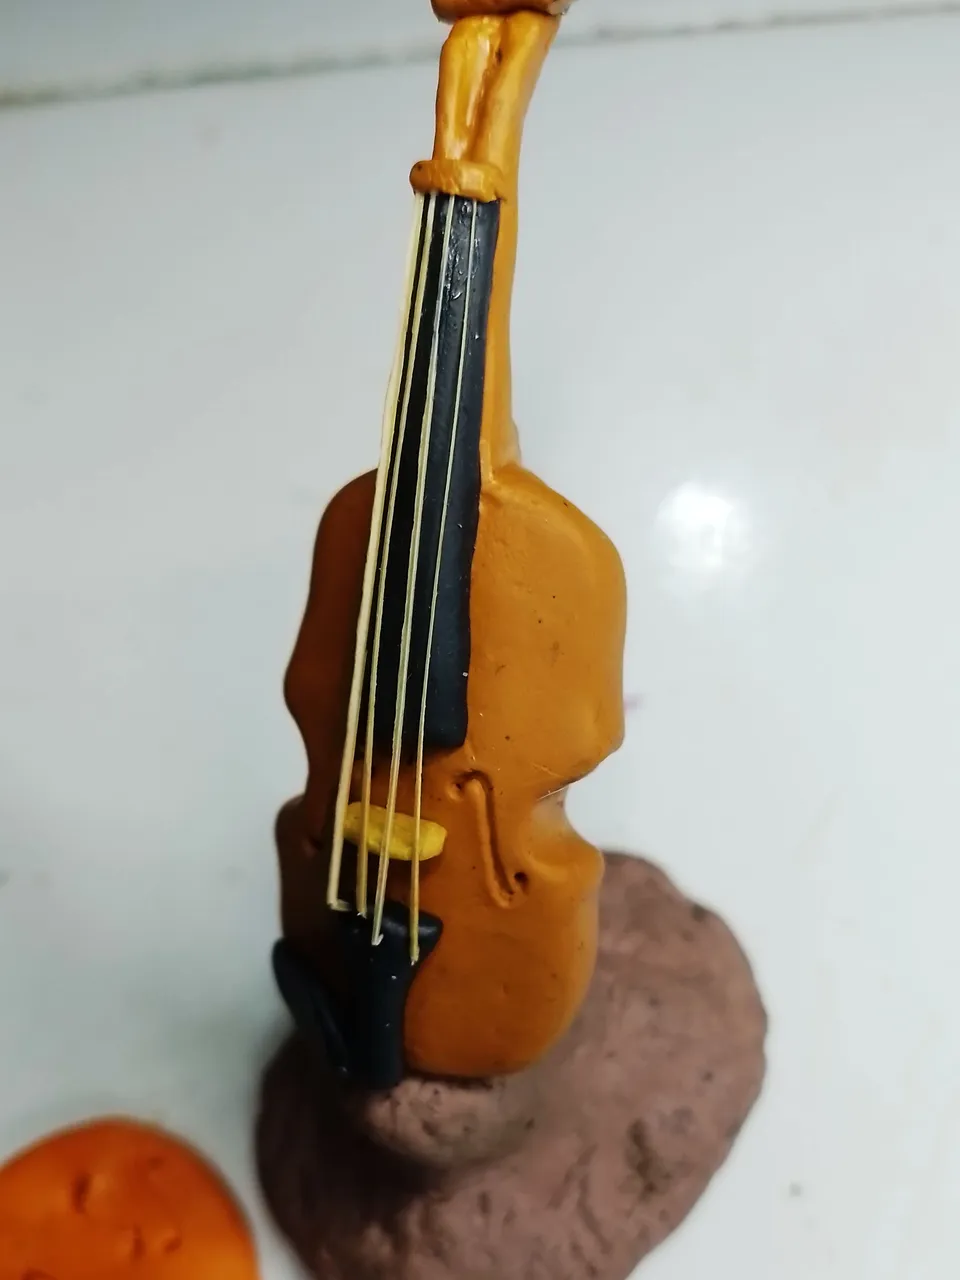
To continue I made the tailpiece, that part where the strings are held at the bottom. I also made the bridge, that little piece of wood between the fingerboard and the tailpiece.
On the left you can see the moment when I placed the tailpiece and on the right when I placed the bridge, a rather small and difficult piece to make and place.
 |  |
|---|
Now comes one of the things that caused me the most problems, the strings. One might think that with any thread you could attach the strings, but no. The material I'm using is quite soft.
The material I am using is quite soft. Although using a thin thread would be the right thing to do, because it is the one that would look good for the sculpture, it would end up cutting the plasticine if it is too long, which would end up damaging the violin.
So in the end I decided to use small wooden sticks, how did I make them? I just cut thin lines of wood from an ordinary wooden toothpick, the kind you use for your teeth. I placed those thin lines at the ends of each place where the strings should go and used glue to fix them.
Below you can see how these sticks look like violin strings.
 |  |
|---|
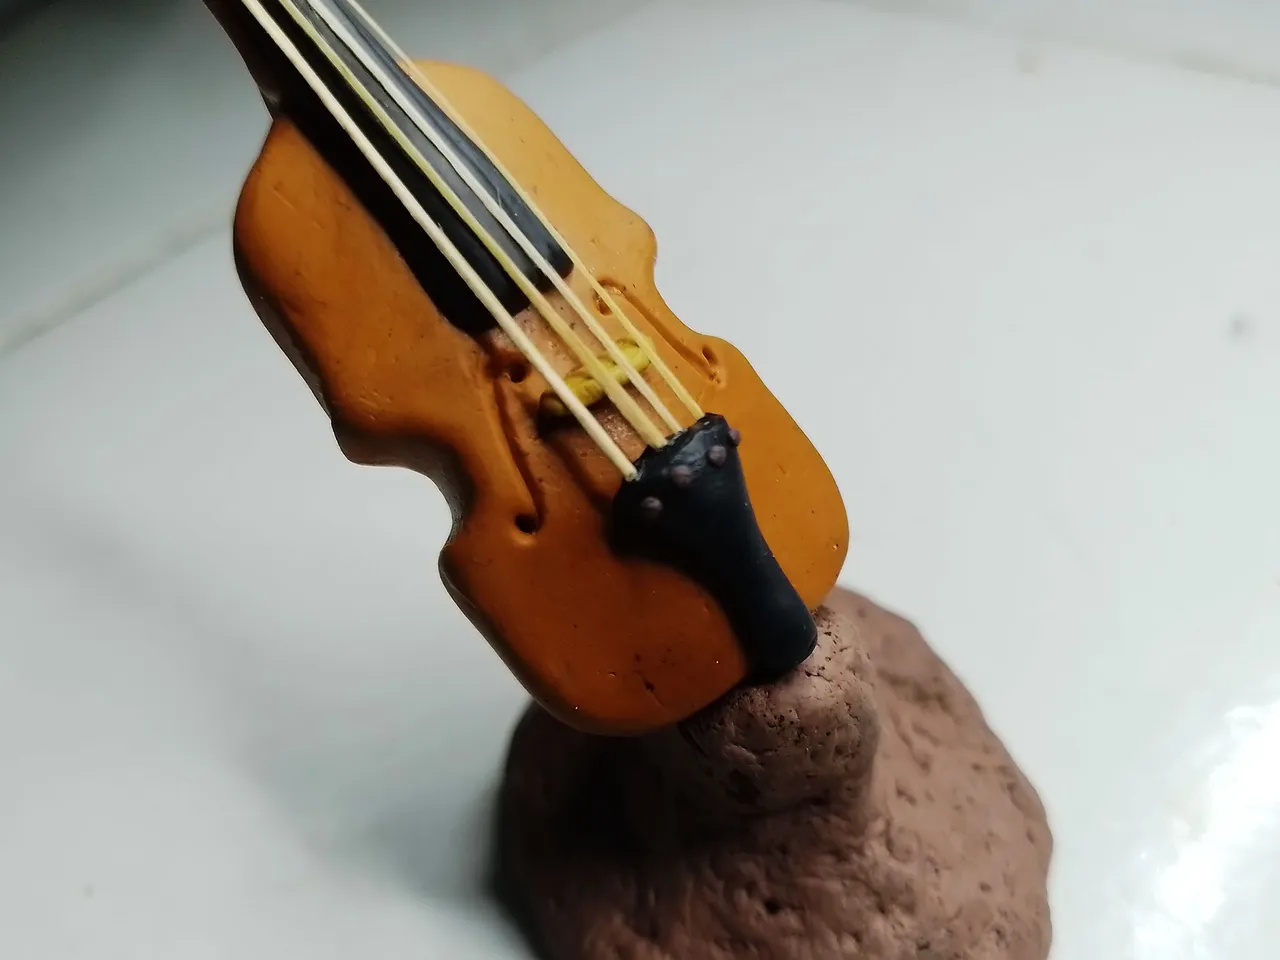
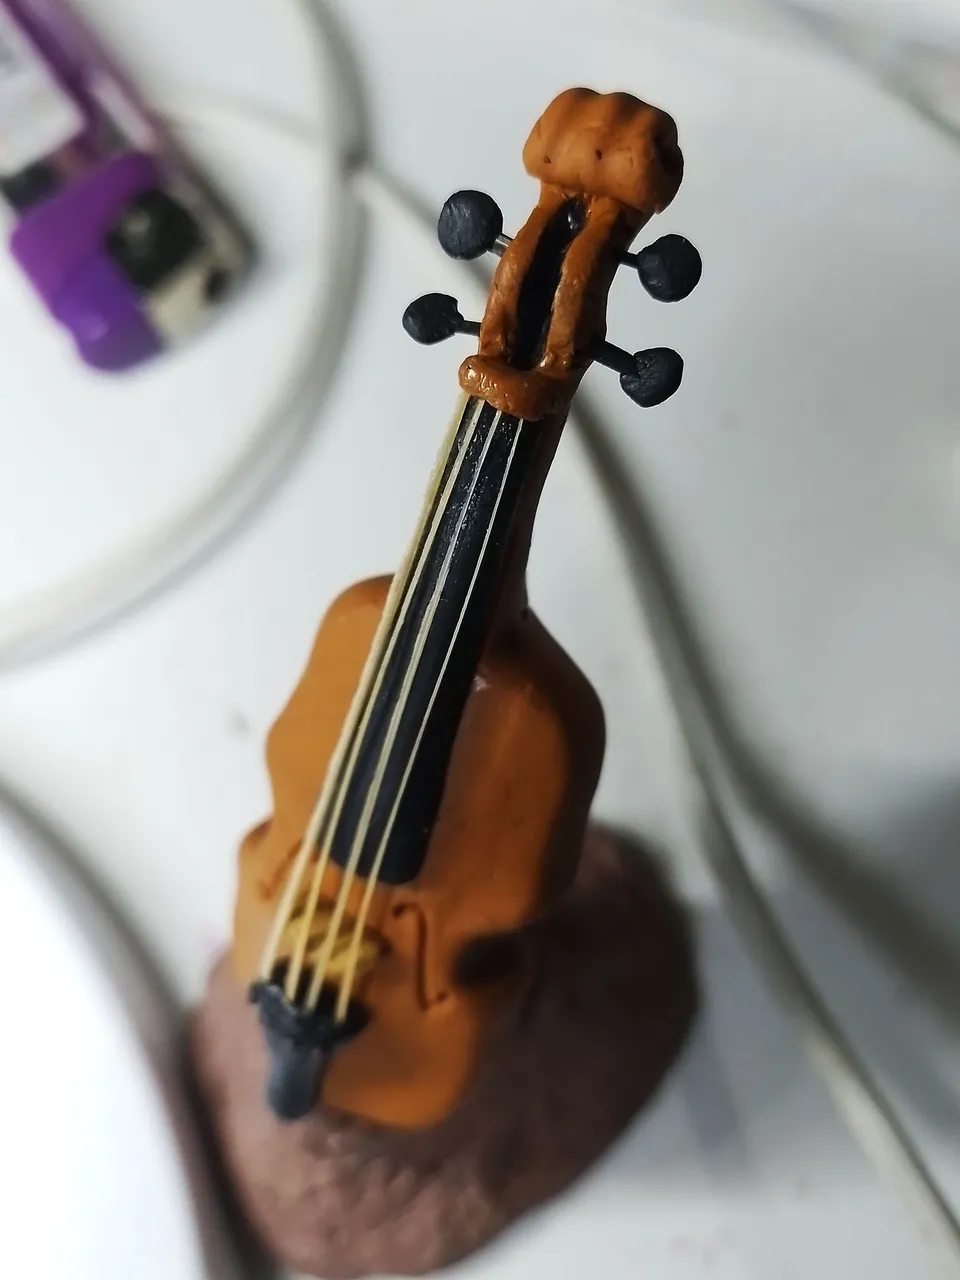
The pegs had to be small. So I used wooden sticks as small as for the strings and painted them with black marker. Then I used plasticine to give it that characteristic shape that the violin has.

Since they were made of wood, I made some channels in the pegbox to put the pegs in place. Then I added more plasticine to cover it and leave the pegbox completely finished. Below you can see the before and after:
 |  |
|---|
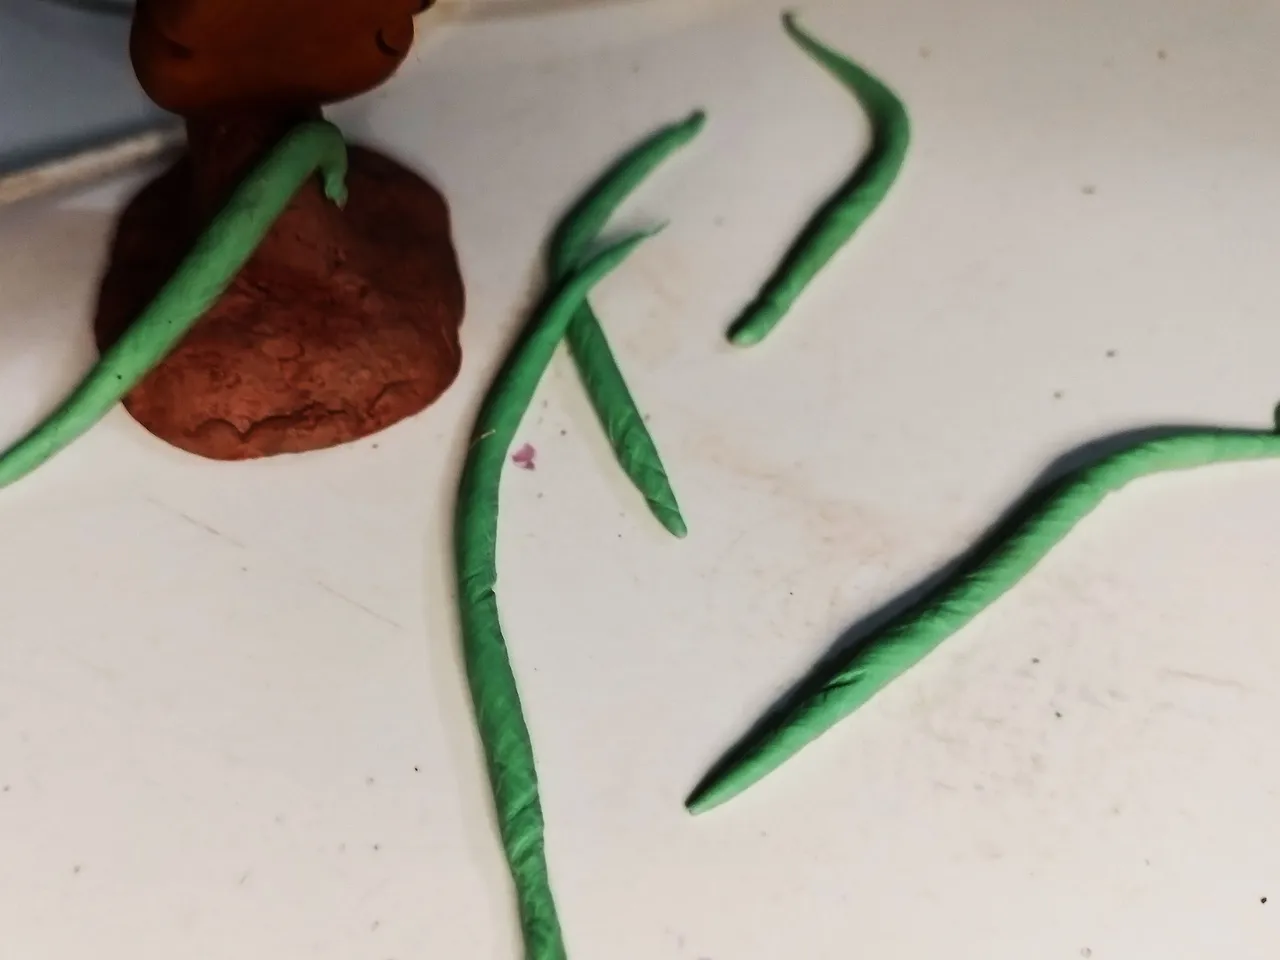
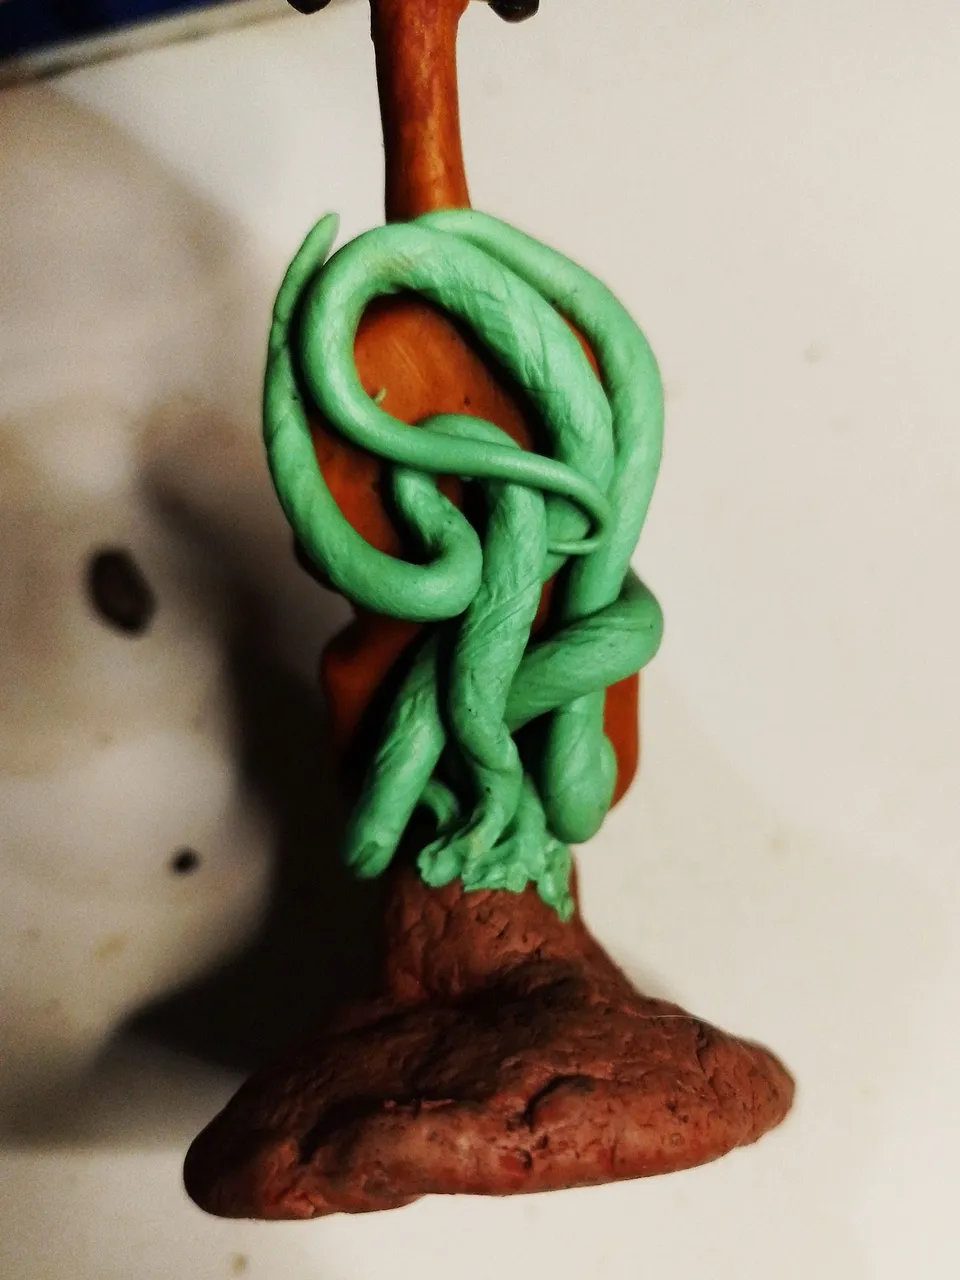
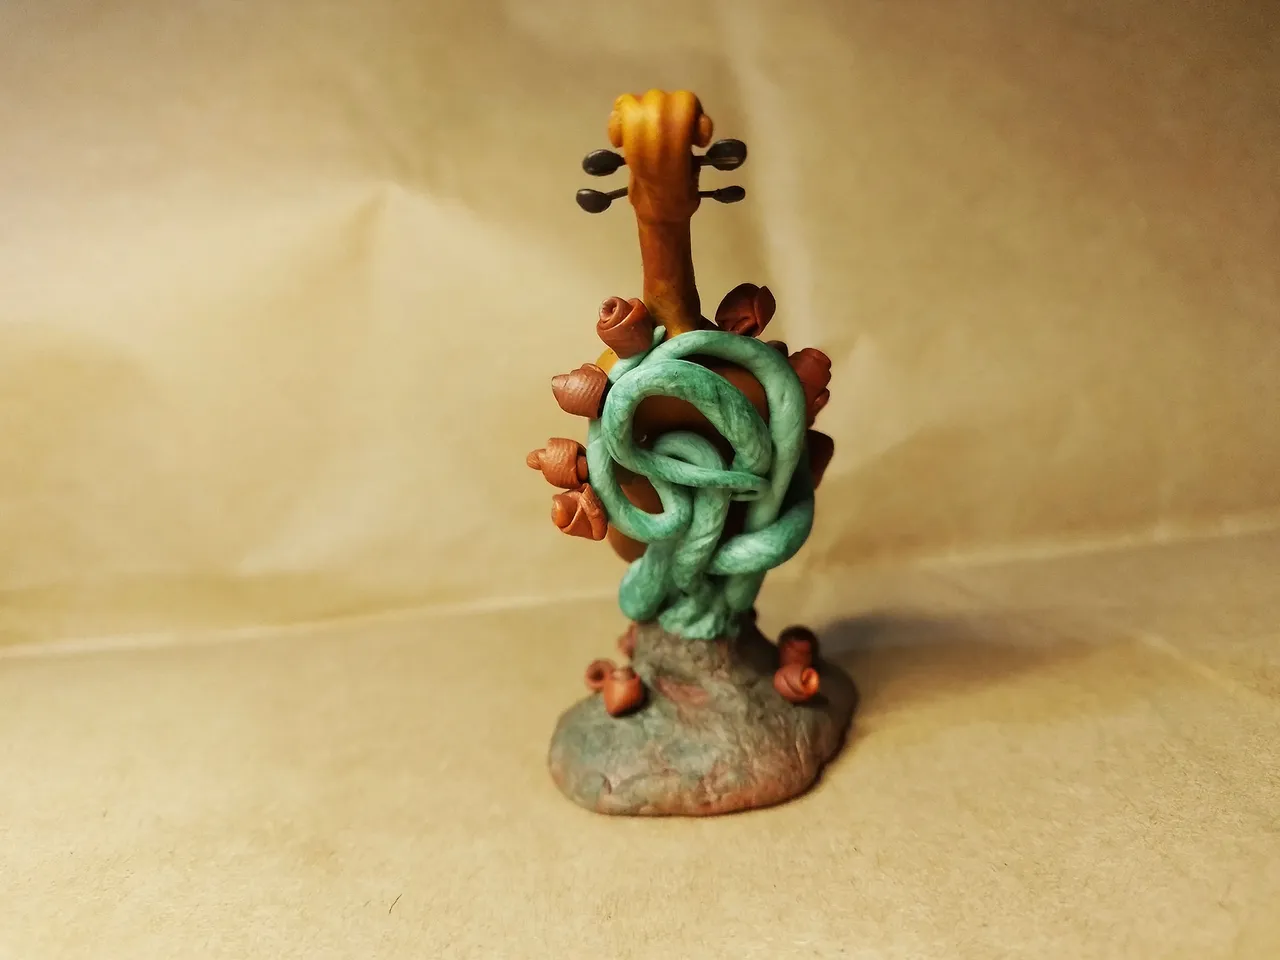
Finally, to give it a more artistic touch, I used green plasticine to create a series of roots from which some flowers would sprout. I placed them as vines on the back of the violin, as if they were coming out of the rock.
 |  |
|---|
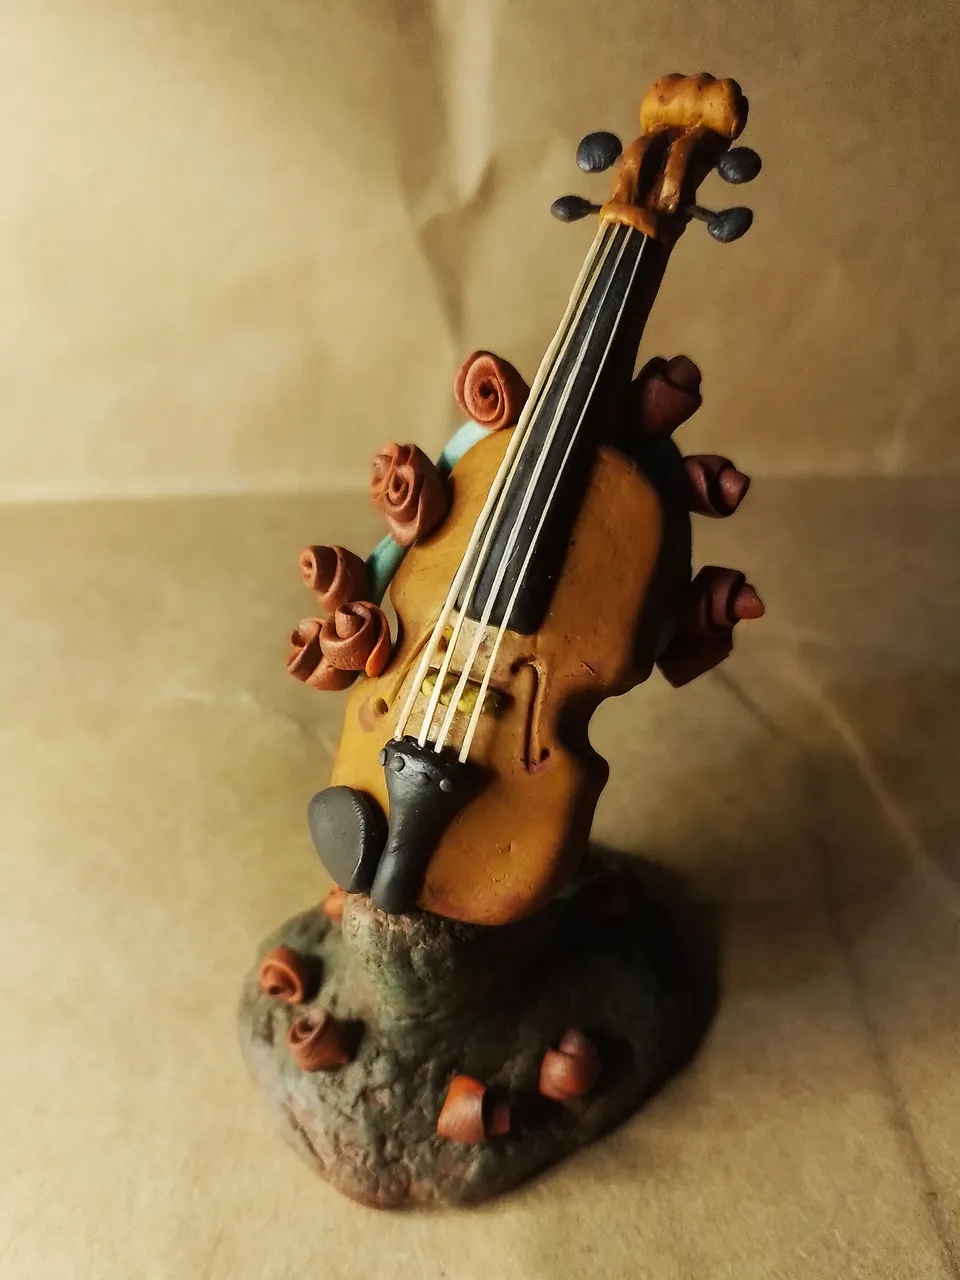
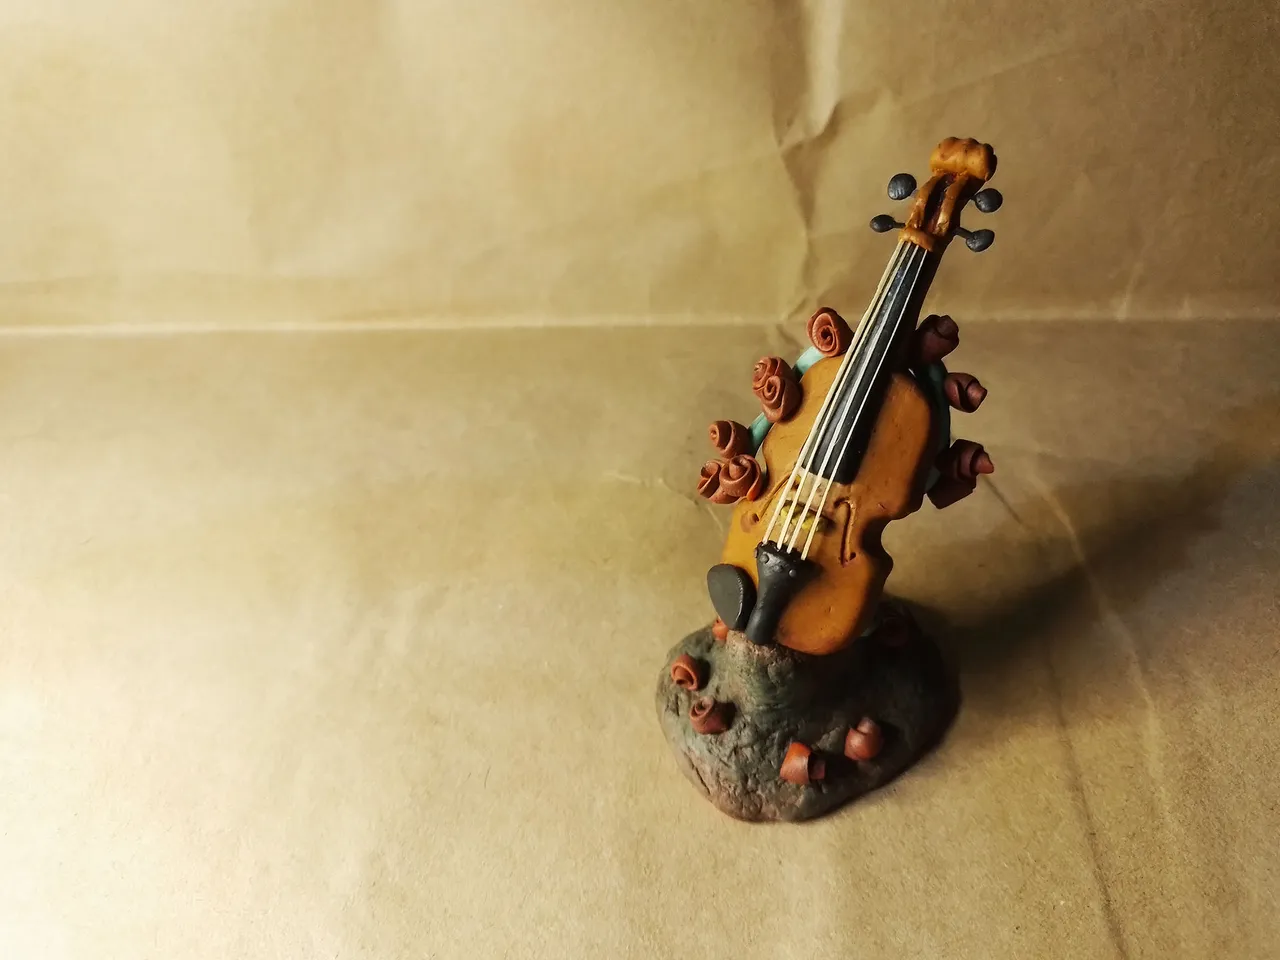
I placed several red flowers along all the green vines, applied some paint and this is how this sculpture of a violin was finished. Below I leave a series of photographs of the final result:
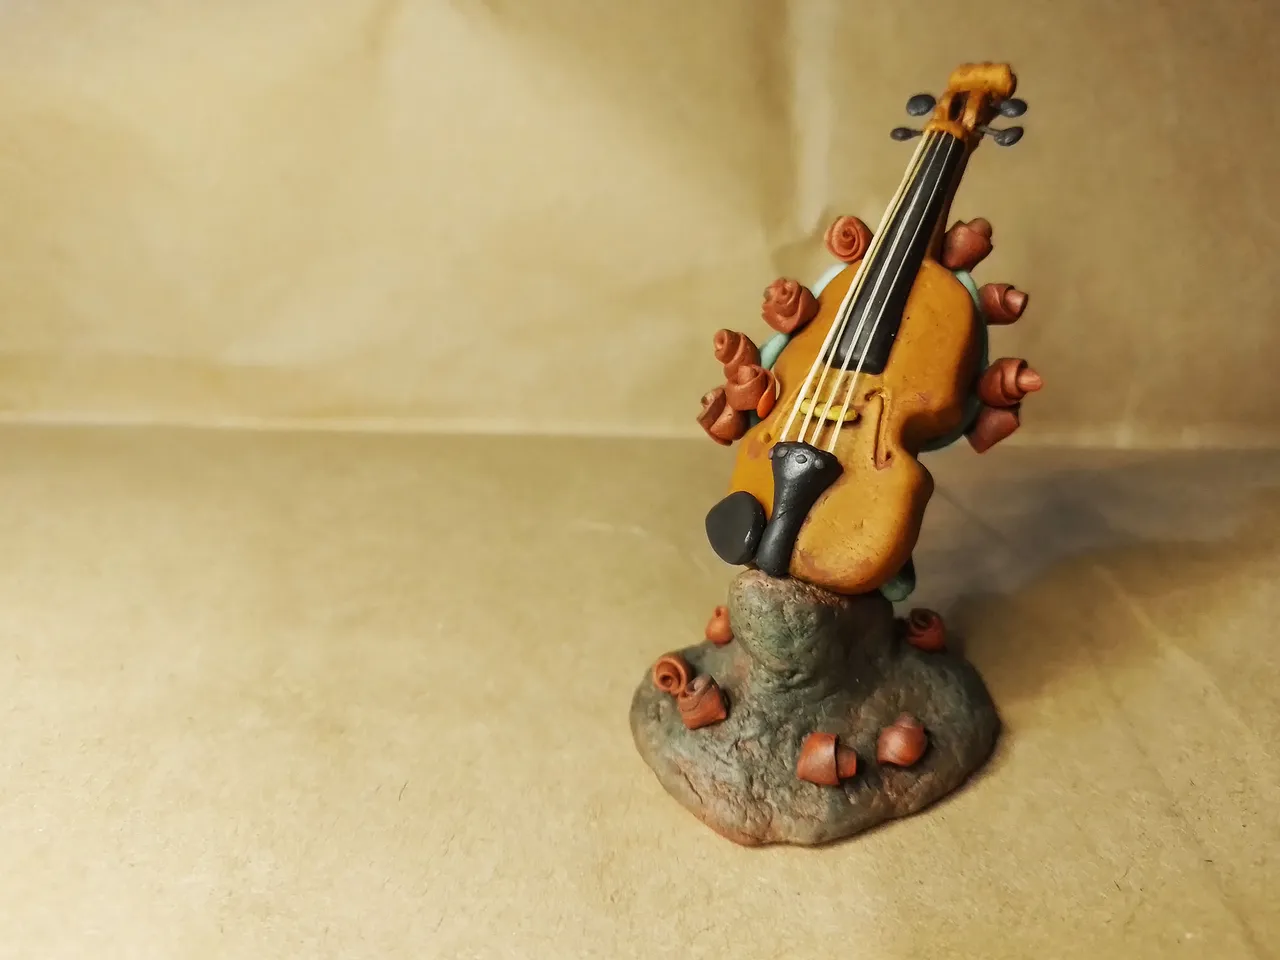
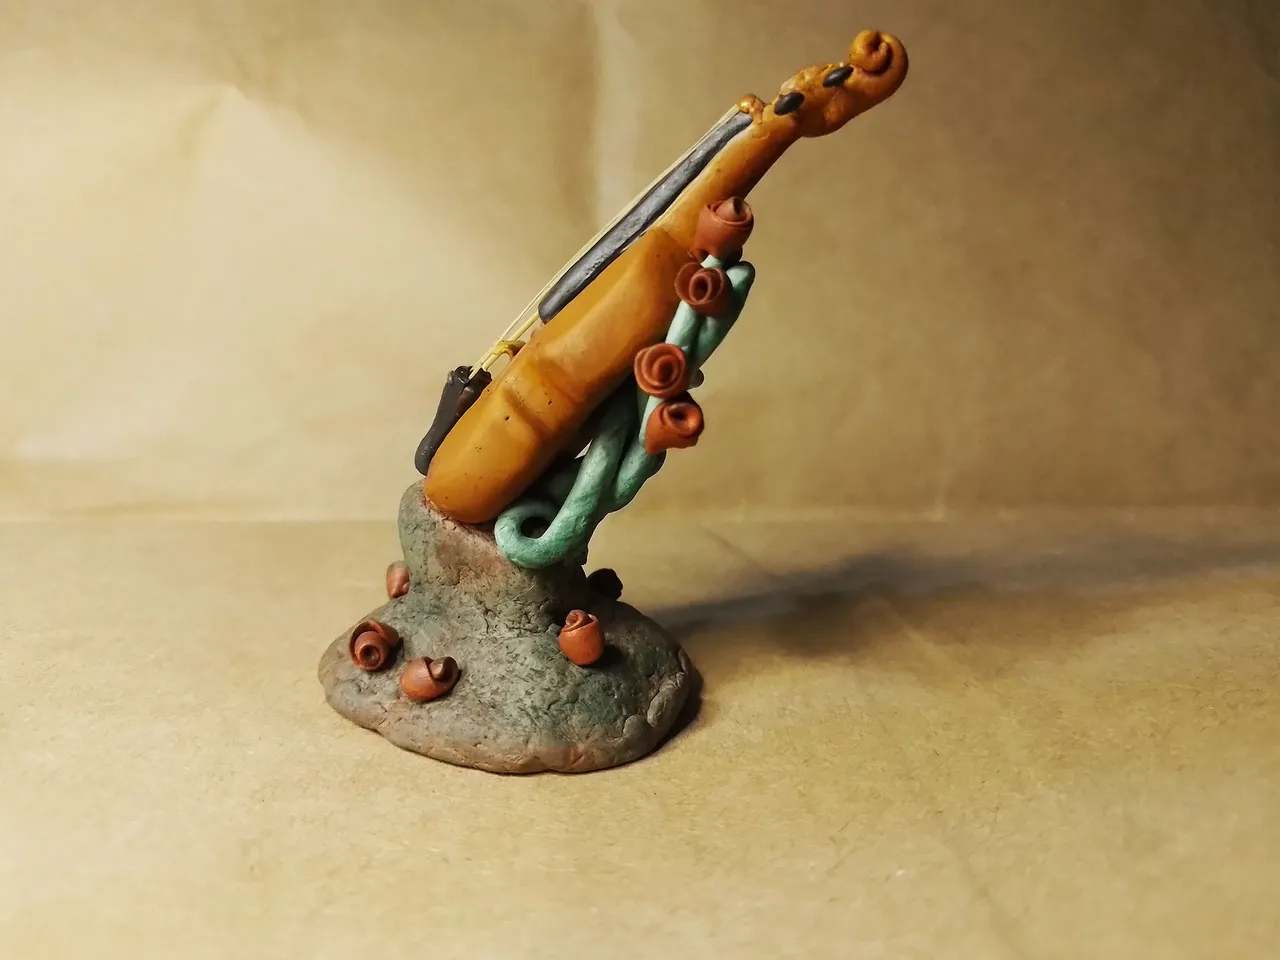

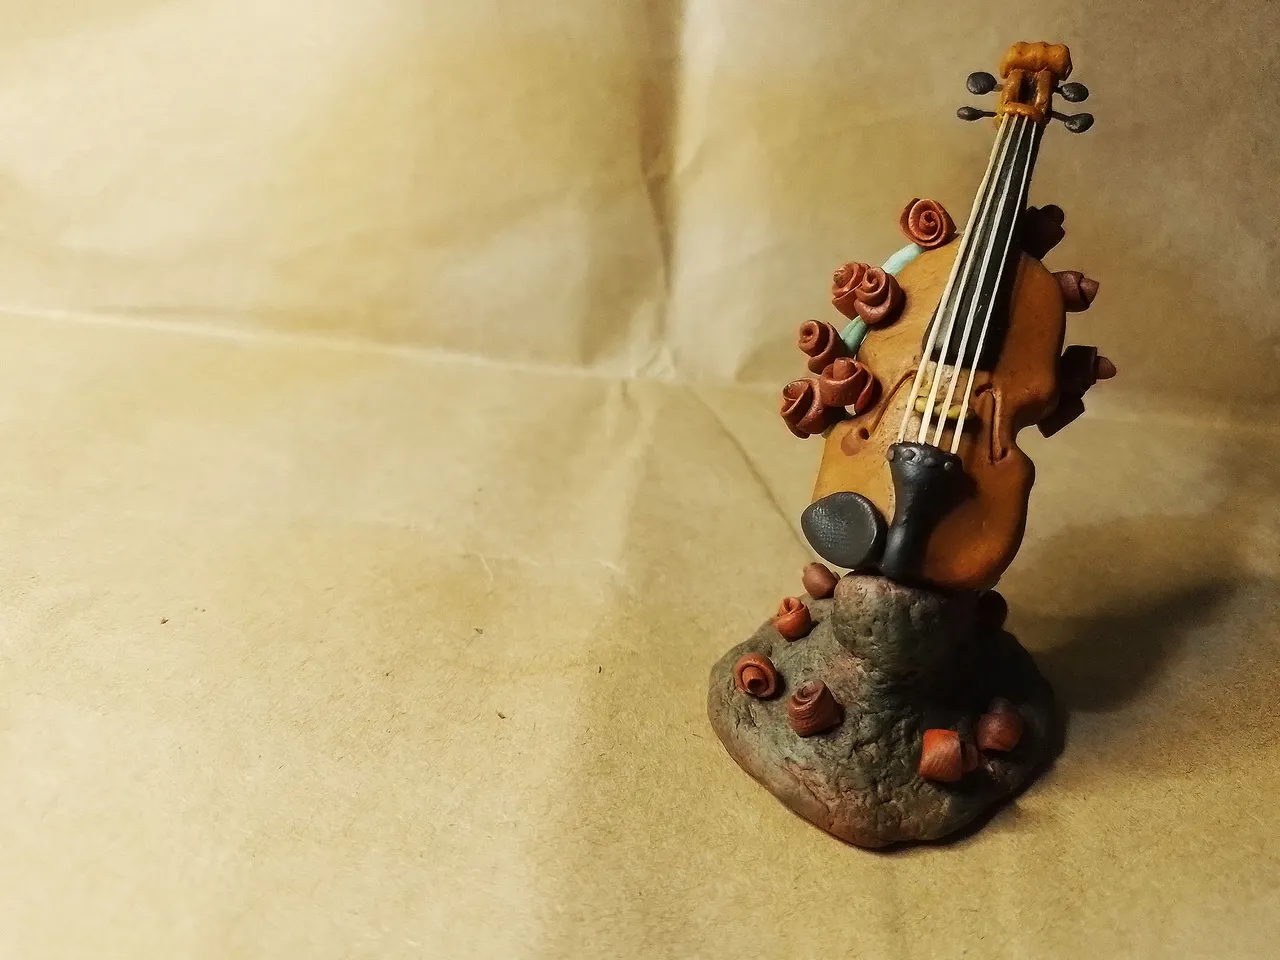
 |  |
|---|
Well friends, that's all for now. I sincerely hope you liked the sculpture. I invite you to leave your opinions below in the comments, as always I will be happy to read them. Without more to add, I say goodbye then...
See you next time!
Español
Sin intenciones de sonar presumido, ni nada parecido, una de las cosas geniales de ser yo es que puedo hacer regalos únicos y personalizados con mis propias manos.
Hace poco quise hacer un regalo a otra vecina que decidió comenzar en el mundo de la música. La verdad tiene talento y para animarla a seguir practicando, decidí hacerle esta escultura de un violín. Acompañenme en el paso a paso de esta escultura, espero les guste.
Bien, para esta escultura utilicé los materiales que suelo usar para hacer este tipo de figuritas. Plastilina, alambre y pintura, también utilicé herramientas como pinzas, agujas de tejer y coser, además de pinceles muy finos, marcadores, una hojilla y unos palillos de madera.
La base de la escultura sería una roca, que serviría de soporte para sostener el instrumento. Para hacer esta roca usé un trozo de plastilina y con esta cubrí el armazón de alambre.
Para darle la textura rocosa usé rocas reales. Simplemente hay que tomar las rocas e imprimir el patrón de la roca en la plastilina, presionando la roca contra el material moldeable. Como pueden ver en la imagen a continuación, esas fueron las rocas que utilicé para darle exa textura:
Para moldear el violin utilicé una plastilina de color marrón, la cual oscurecí un poco con plastilina amarilla y negra. Una vez que obtuve el color deseado comencé a moldear.
Debo aclarar que la señorita a la que le entregué este regalo tiene un violín, así que fue el que usé como modelo para la escultura.
El proceso de moldeado no fue fácil, debo confesarlo, pero poco a poco logré alisar la plastilia lo suficiente hasta lograr el resultado deseado, o cuando menos, uno que se acercara bastante a la forma del violín.
Aquí pueden ver las dos partes principales de la escultura, el cuerpo del instrumento y la base sobre la cual descansará:
Para colocar el instrumento sobre la base, dejé un alambre sobresaliendo de la plastilina. Hice un agujero que atravesó a todo el violín y a través de este agujero introduje el alambre que iba desde la base con forma de roca, así toda la escultura pasaría a ser una sola pieza.
Luego de esto hice otra de las piezas más complicadas de la escultura, algo que podríamos llamar como en el cuello (mango) y la cabeza (clavijero), donde está el característico caracol que tiene en la punta superior.
Debo confesar que tuve que dañarlo y volverlo a hacer un par de veces, porque no me quedaba bien. Parecía a veces un Chello o un contrabajo, pero al final logré darle la forma más adecuada al instrumento.
A continuación pueden ver unas cuantas fotos de esta parte del proceso creativo. Incluso, pueden ver el soporte de madera para la parte negra del violín, que va en el centro.
| |
|---|
Esta parte negra, llamada diapasón, la hice cubriendo el soporte de madera antes mencionado con plastilina negra. Una vez hecho lo coloqué en su lugar.
Luego de esto terminé con la cabeza del instrumento o el clavijero. Las clavijas las colocaría más adelante.
En este punto el intrumento ya estaba tomando forma, se veía así:
| |
|---|
Para continuar le hice el cordal, esa parte donde las cuerdas se sujetan en su parte inferior. También le hice el puente, ese pedacito de madera que está entre el diapasón y el cordal.
A la izquierda pueden ver el momento en que coloqué el cordal y a la derecha cuando coloqué el puente, una pieza bastante pequeña y difícil de hacer y colocar.
| |
|---|
Ahora viene una de las cosas que más problemas me causó, las cuerdas. Uno podría pensar que con un hilo cualquiera se podrían colocar las cuerdas, pero no.
El material que estoy utilizando es bastante suave. Aunque usar un hilo delgado sería lo correcto, porque es el que quedaría bien para la escultura, este terminaría cortando la plastilina si tiempla demasiado, lo cual terminaría dañando el violín.
Así que al final decidí usar pequeño palillos de madera. ¿Cómo los hice? Solo corté delgadas líneas de madera de un palillo de madera común y corriente, de esos que se usan para los dientes. Esas delgadas líneas las coloqué en los extremos de cada lugar en donde deben ir las cuerdas y usé pegamento para fijarlas.
A continuación pueden ver cómo quedaron estos palillos simulando las cuerdas del violín.
| |
|---|
Las clavijas debían ser pequeñas. Así que usé palillos de madera igual de pequeños que para las cuerdas y los pinté con marcador negro. Luego usé plastilina para darle esa forma característica que tiene el violín.
Como eran de madera, les hice unos canales en el clavijero para colocar las clavijas en su lugar. Luego agregué más plastilina para cubrirla y dejar el clavijero completamente terminado. A continuación pueden ver el antes y el después:
| |
|---|
Por último, para darle un toque más artístico, usé plastilina verde para crear unas suertes de raíces de donde brotarían unas flores. Las coloqué a manera de enredaderas en la parte trasera del violín, como si estuviesen saliendo de la roca.
| |
|---|
Coloqué varias flores rojas a lo largo de todas las enredaderas verdes, apliqué un poco de pintura y así quedó terminado esta escultura de un violín. A continuación dejo una serie de fotografías del resultado final:
| |
|---|
Bien amigos, esto ha sido todo por ahora. De corazón espero que la escultura les haya gustado. Los invito a dejar sus opiniones abajo en los comentarios, como siempre estaré encantado de leerlos. Sin más que agregar, me despido entonces...
¡Hasta la próxima!
Traducido con DeepL
Mejora tus publicaciones usando Tablas - Tutorial
Improving Instant Soup
Turtle Sculpture